
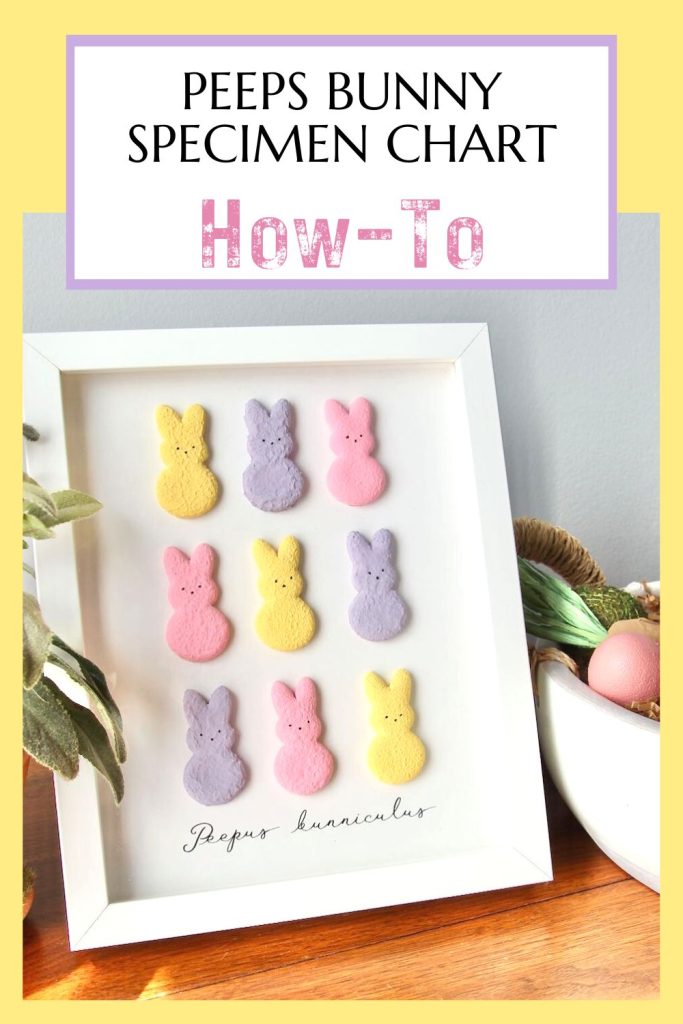
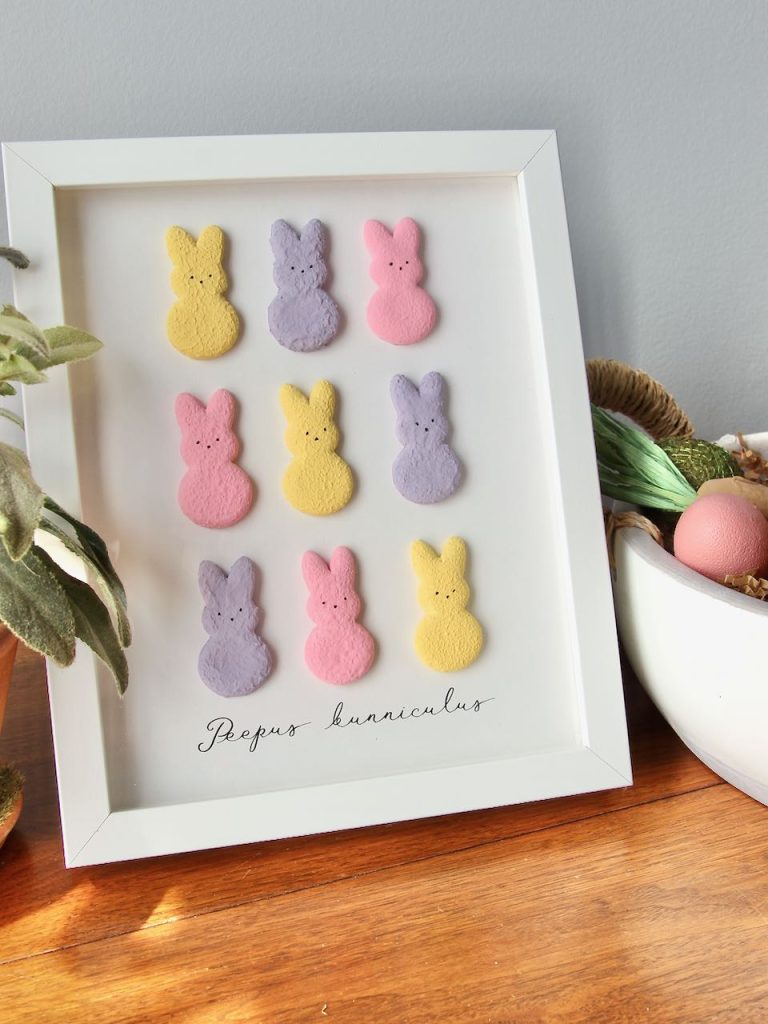
How To Make the Cutest Retro Peeps Botanical Wall Art
Wouldn’t you love to have the cutest Easter Peeps wall art? Something a bit retro, a bit specimen chart wall art -ish? It’s simple, fun and inexpensive to make! And a guaranteed smile producer.
I love rotating fun seasonal accent into my home decor throughout the year. You with me?
But it can sure rupture a budget, not to mention where to store it all, right?
For for today, toss those bummer thoughts aside.
With today’s project, you won’t be able to help but smile! Plus, it’s fun, easy, and low cost.
And did I mention it’s easy to store?
Seasonal wall art is a great way to sprinkle some fun changing decor throughout our homes. But it takes storage space for all that seasonal decor.
Let’s face it, flat items are easier to store than baskets and statues in the Spring, or pumpkins and gourds in the Fall.
And when I say wall art, that doesn’t mean it has to literally hang on the wall. It can be any flat-ish piece of art or happy Easter signs that also could:
- sit on a shelf
- lean on a ledge
- perch on a pedestal
- or a tray
- or part of a vignette
Do you love all the vintage books filled with botanical prints? I know I do!
I’m also a sucker for scientific glassware and classic classroom aids — vintage flashcards and periodic tables, globes and chalkboards (of course).
But rather than making my own botanical art, I pivoted just a bit to make my own zoological specimen art.
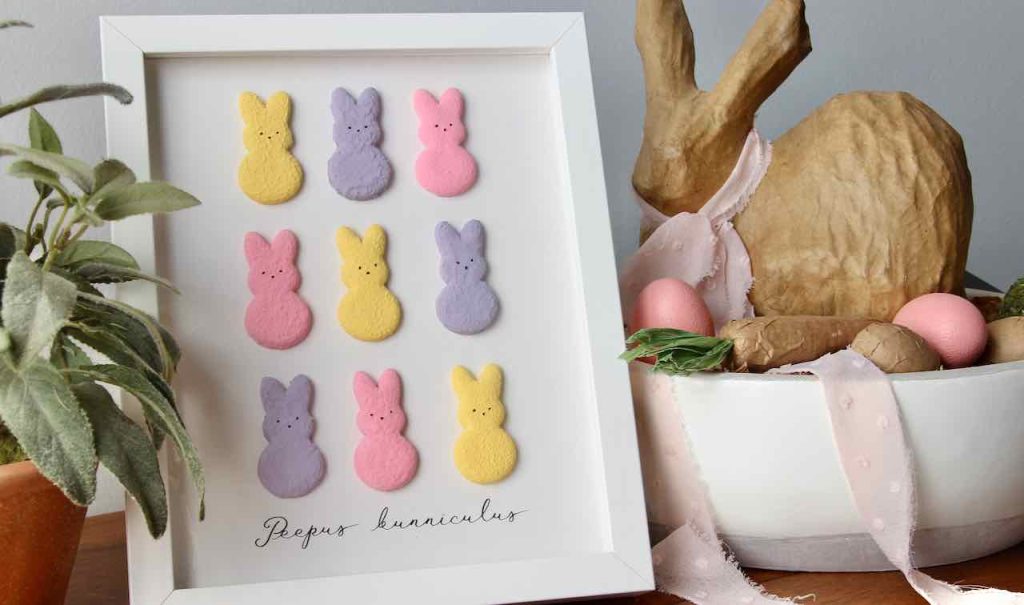
I opted for bunnies, as in Peeps Bunnies!
Easter Peeps Specimen Art
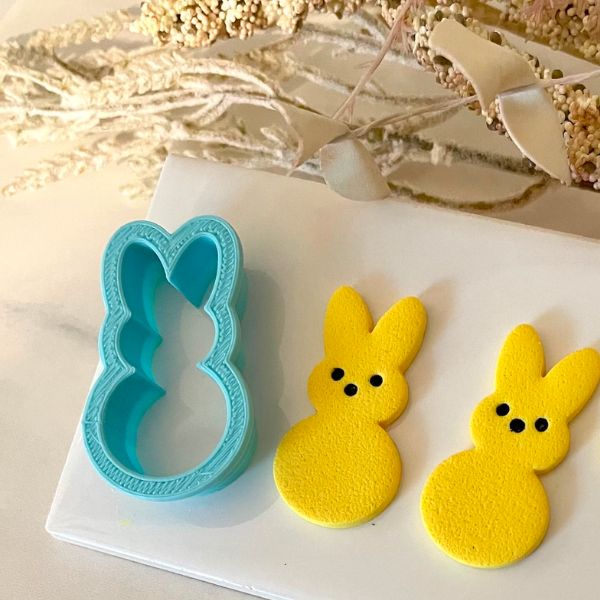
It all started with this adorable clay cutter that I received from So Cal Cutters. I used it here to make the cutest little silk-screened Peeps as part of these Easter place settings.
Now, I’m using it for this charming Easter Peeps Specimen Chart:
- used simple air dry clay
- Peeps bunny clay cutter
- Basic cheap craft paint
- and a cheap deep frame I had on hand that I modified to become a shadow box frame
Sounds easy, right? That’s because it is.
It’s like Peeps clip art, but in 3-D. And who doesn’t love the retro nostalgia of Peeps (provided you don’t have to eat them)?
Table of Contents:
Materials and Supplies:
- White Air Dry Clay
- Peeps Clay Cutter
- Saran Wrap or similar
- Acrylic clay roller or substitute
- Tissue blade, or dental floss
- Tile of glass work surface
- Sand paper 120 or 220 grit
- and/or nail file
- Craft paints
- Baking soda
- Stenciling brush
- Thin paint brush
- Wax paper
- Deep box frame
- Balsa or bass wood strips
- Spray paint or craft paint to match frame
- Heavy Paper
- Spray Glue
- Push pins or tacks
I’ve compiled this shopping list of the specific products I use and recommend. Be aware that these may be affiliate links which means you pay nothing more, but I may receive a small a small compensation. I truly appreciate you using one of these links whenever possible so I can continue bringing you fun projects, tutorials and inspiration. I will never recommend a product I do not believe in.
Let’s Craft A Fun Peeps Specimen Chart
First thing, order the Peeps clay cutter from So Cal Cutter!
Step 1) Soften and Roll Out Your Clay-
- Cut about an inch chunk of clay off your block of clay
- Warm it up in your hands and start kneading it
- Turning your clay over fairly frequently, roll it out on a smooth tile, thick glass or similar work surface
- Lay two lengths of balsa or bass wood down each side of the clay to use as rails for your acrylic rod. This assures even thickness of clay
NOTE: Today’s post assumes you have some experience with clay. If not, refer to this post for a more thorough discussion of air dry vs. polymer clay and the tools and basic process of rolling and cutting.
Step 2) Cut of Peeps-
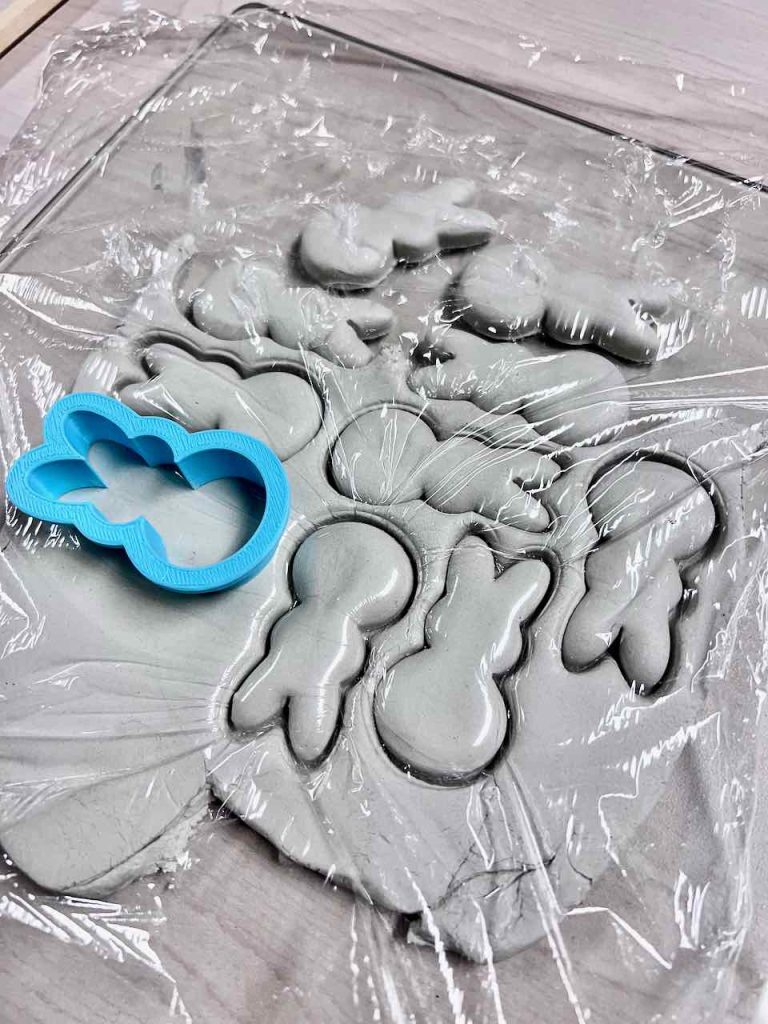
- Once you have your clay smooth and ready
- Add a piece of Saran Wrap or similar smoothly over the clay
- Place your cutter and press down all the way for each bunny
Pull up the scrap clay around the peeps. Roll it into a ball and it seal up airtight to use for your next project.
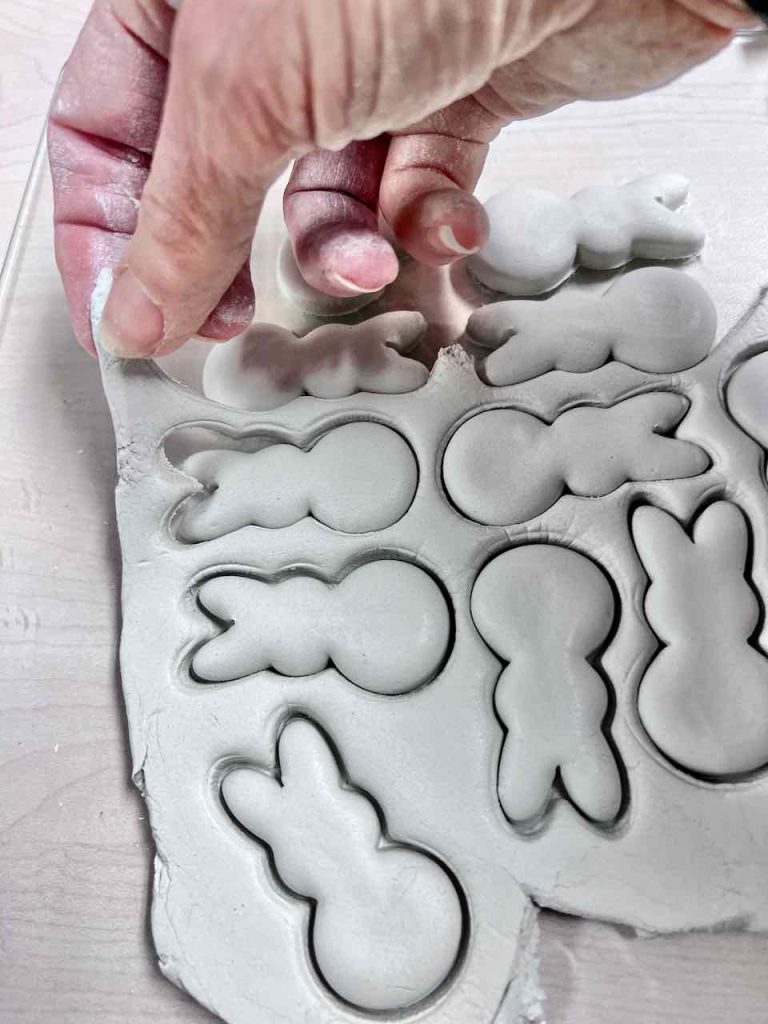
Pull up the plastic wrap and marvel at the soft curved edges of your bunnies! Isn’t that the neatest trick!
Slight pause in the action: if you are enjoying this project, please consider joining us regularly:
Thanks Bunches! Now onward to the cutest Spring wall art!
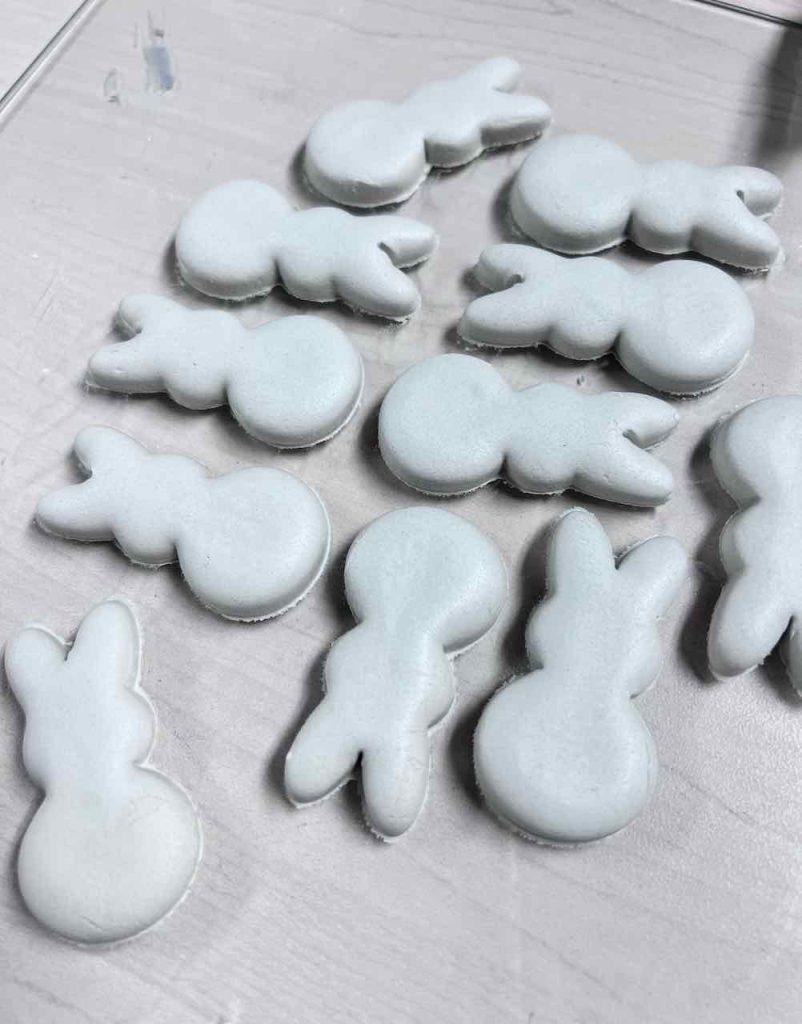
Step 3) Let Them Dry-
- Sliding a clay tissue blade side to side under each peep, carefully lift each peep off the work surface. Optionally, you can use a piece of dental floss pulled taut working it back and forth between each peep and the work surface.
- Place the peeps on their backs on a piece of wax paper. Elevating on a baking rack will help them dry a bit quicker
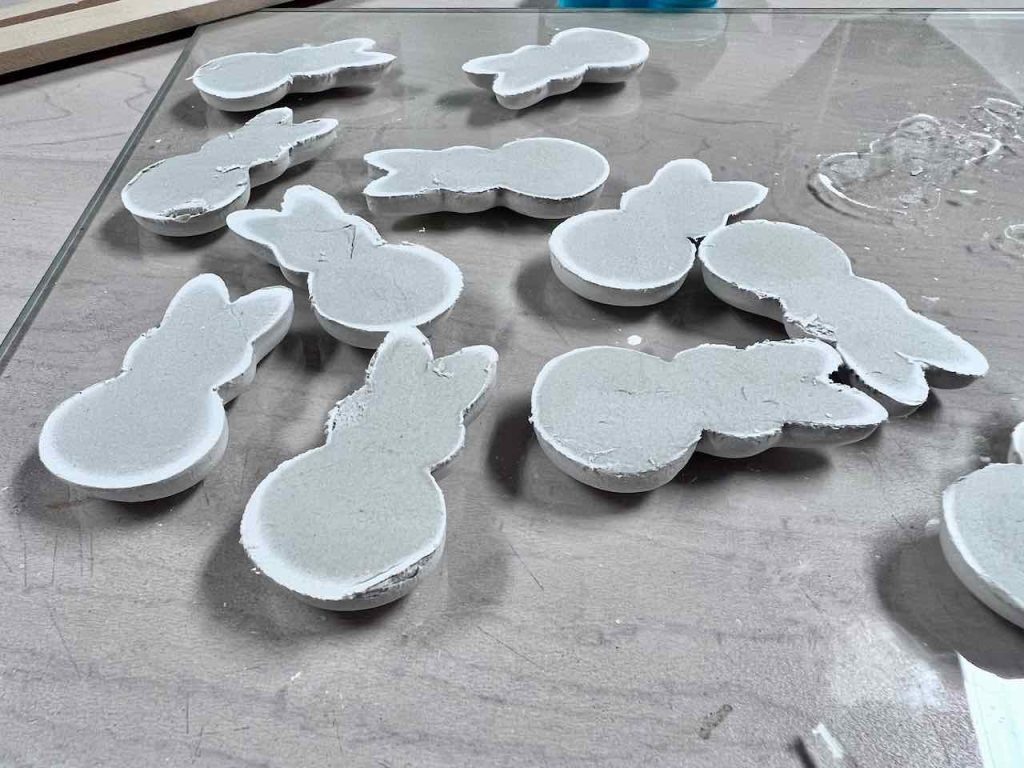
- After 8 – 10 hours, if they are all white on top, gently turn them over to dry the other side
- In another 10 – 12 hours, they should be ready to paint.
While your peeps are drying, now is a good time to prep your frame.
Step 4) Adjust Your Frame to Become a Shadow Box Frame-
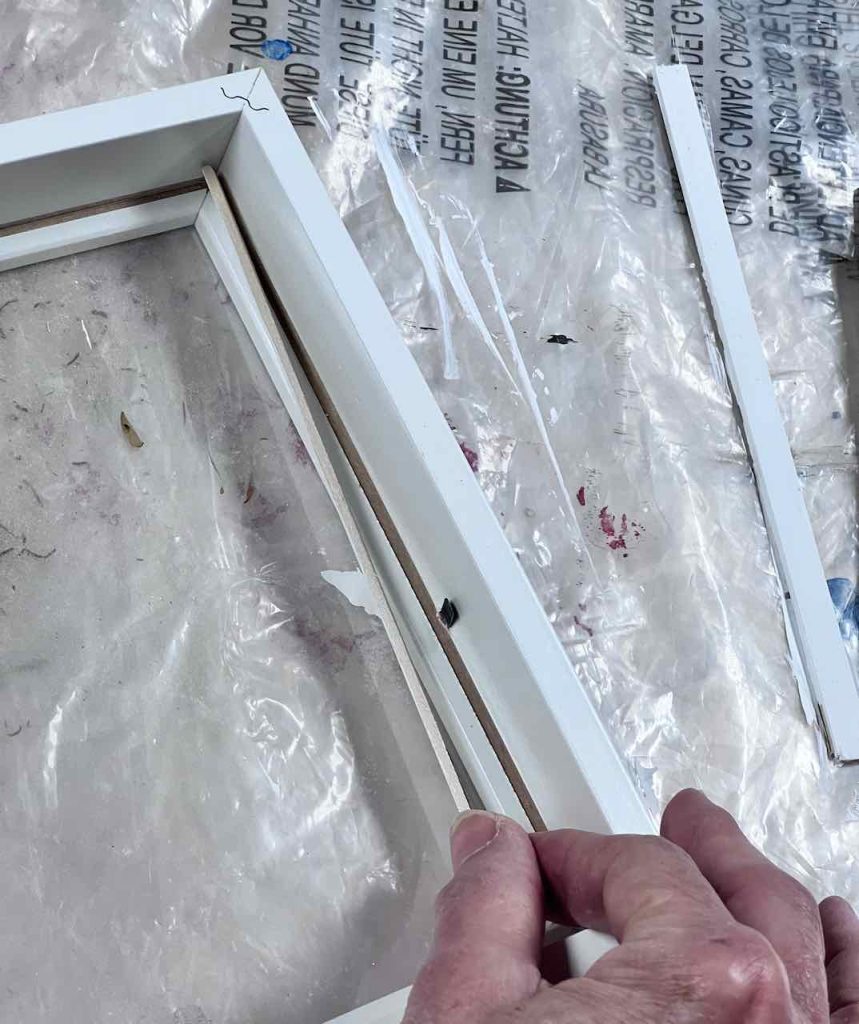
- Take the back off your frame
- Determine the depth you need for your Peeps
- Find balsa wood that is a bit deeper than your Peeps
- Cut the balsa wood to fit the length and width of your frame
- Spray paint or brush paint to match your frame
- Glue in place
This is one of my favorite hacks for adapting frames from thrift stores or the clearance wall art from Hobby Lobby.
You know the ones that are marked down 90%. Yes, this one was 70-cents!!! I knew I didn’t want the print in it, but I can always use basic frames like this and it even had a nice matt in it. For 70-cents, I now have a shadow box frame for my Easter Peeps Specimen Chart! Victory!
Step 5) Sand edges of Peeps-
- The edges of your Peeps and between the ears will probably need a little bit of cleanup sanding. Use a very light touch. You’re really just taking off the rough edges from where it was attached to the work surface.
TIP: Between the bunnies ears, a nail file works great or fold a piece of sandpaper and slide it down between the ears.
Step 6) Paint Your Peeps-
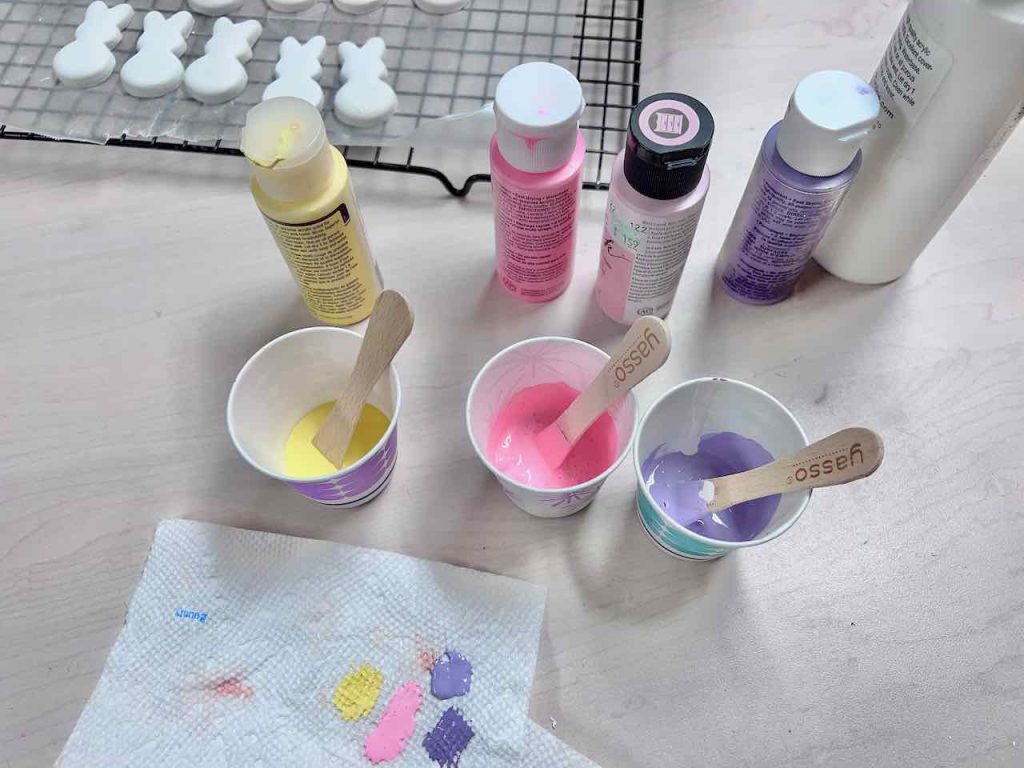
- Start by mixing the colors you want for your Peeps. You don’t have to use the same three I did. According to y research 4/5 of all the Peeps sold are yellow. I was tempted to do all yellow with one pink one thrown in. You choose what’s right for you.
TIP: Place a little smear of each color on a white background — it was a paper towel for me. Then you can easily see. if the three colors work together. Adjust accordingly.
With this trick, I quickly saw that my original purple was a bit too dark. I added more white, and tested again. Much better.
- Use a thin craft brush to get a base coat between the ears and in each of the side creases and then paint the rest of the base coat.
- For the top coat, mix in some baking soda to give your paint the texture of marshmallow peeps.
TIP: Start with less, you can always add more. Test the texture on a piece of scrap paper until you get the level you want.
NOTE: For about 1/4 of a dixie cup, I added about one heaping plastic spoonful. By the way, that was way more paint than I needed for just three little bunnies each.
- Now with a stenciling paint brush, pounce the textured paint onto the Peeps. Get the sides and all over the front. Place on wax paper to dry
This is the same technique I highlighted in this post using clay hearts. Just leave off the final flour step. And if you prefer video for learning new techniques, it’s right here.
Step 7) Print Out Specimen Backing-
- The backing sheet I made is available free to all my email or newsletter subscribers as a free download. You can find it in the printables library (remember the password is in the most recent email you received). If you are not yet a subscriber, no worries, sign up and you’ll have immediate access.
- Or make your own zoological classification in the font of your choice.
HINT: You need a genus followed by a species, both should be italicized and only the genus capitalized.
- Print your backer on heavy paper using your home printer
- The printout is designed for an 8 x 10 frame, but will print on an 8.5 x 11 sheet of paper. If your frame measures 8 x 10 as mine did, place the printed paper on top of your frame backer with the left sides lined up. Adjust so the genus and species are at your desired height. Make a faint outline of the frame back on the paper. Then trim the paper backing to fit.
- Use spray glue on the frame backing and apply the backing paper.
Step 8) Assemble –
- Glue each bunny in place. I used E6000, my go-to glue for heavy crafts.
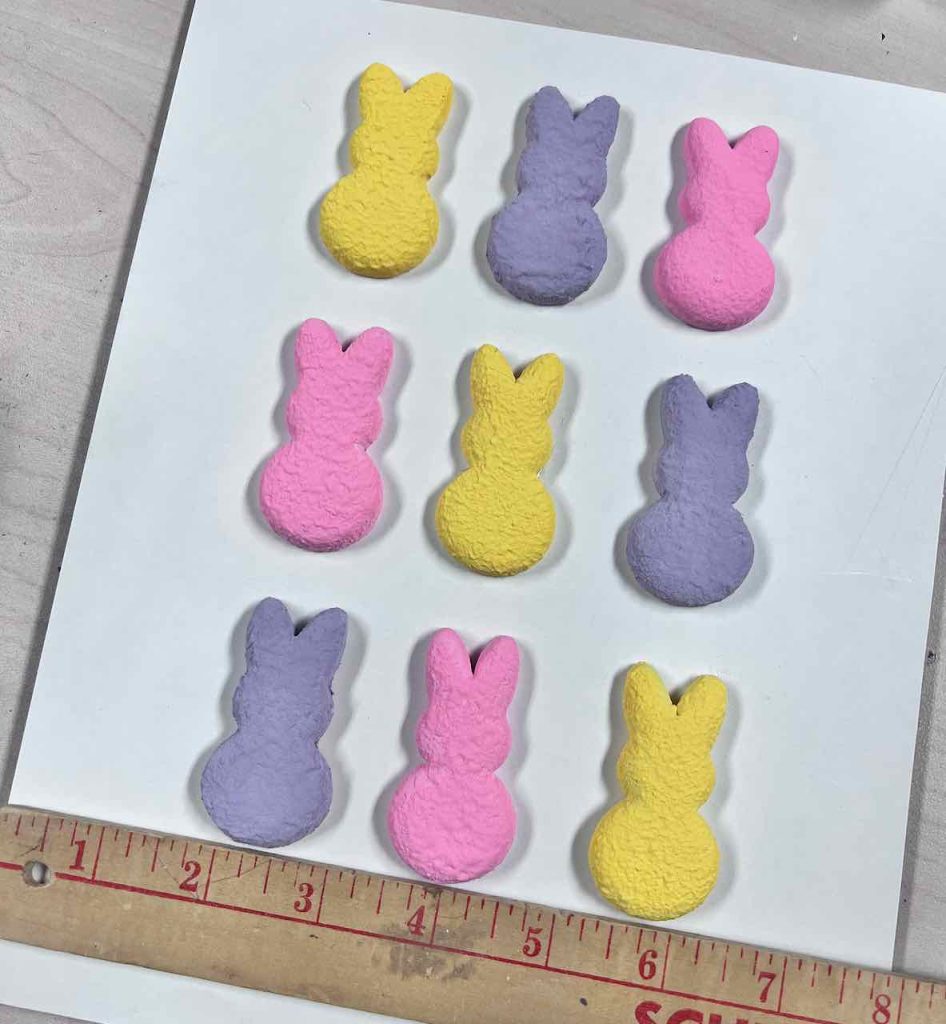
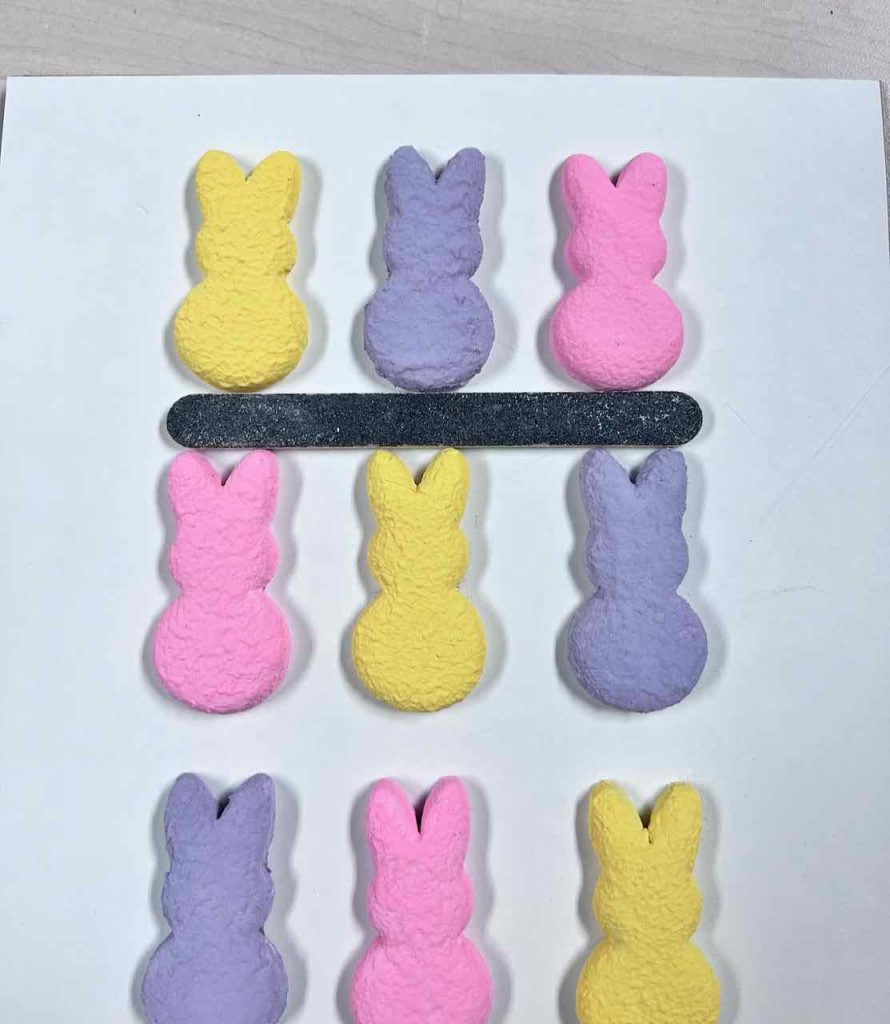
TIP: Starting where I wanted the lowest row to sit, I laid a ruler across my paper and placed the middle bunny first, then spaced the sides bunnies. Then I used a nail file (it’s what I had handy that was about the right thickness) to mark the height of the next row.
- Once your bunnies are dry and secure, clean the glass or plexi on the front of your frame and then lay the back in place resting on the wood strips you added to your frame.
- To hold the back in place, I use push pins. Make sure the head is tight against the backing and push them into the wood sides of your frame.
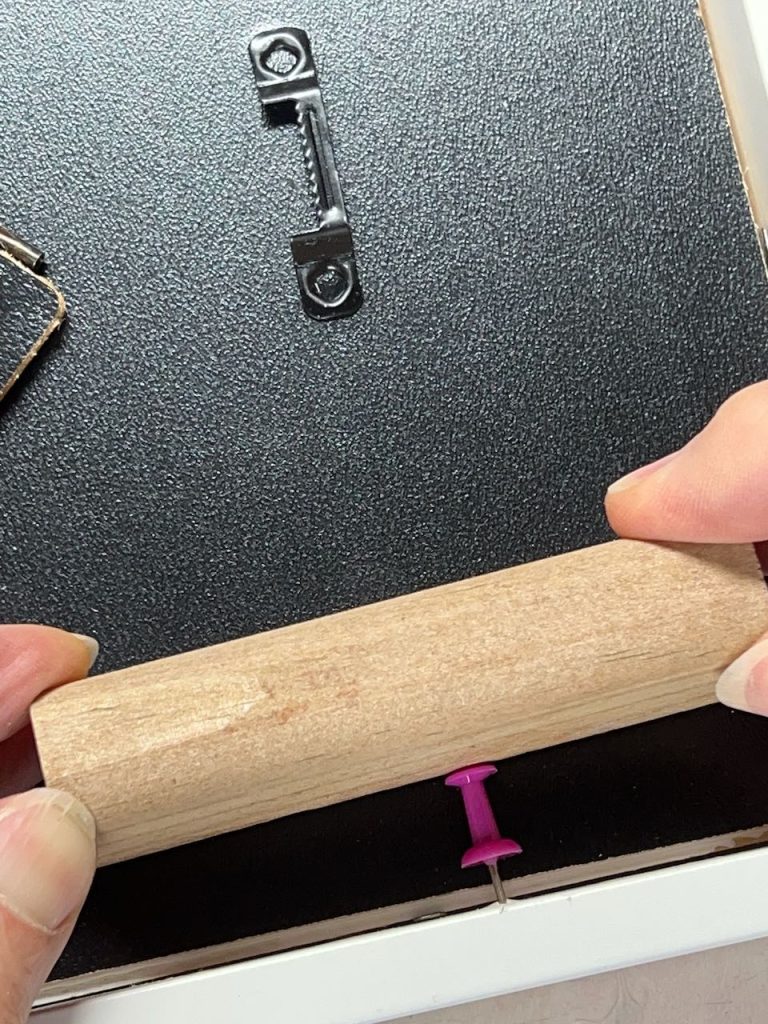
TIP: This is so much easier and more effective if you use a small block of wood or something similar to push against the head of the push pin.
Suggestions For Where to Display Your Peeps Specimen Chart
Really this fun Easter art can sit or hang anywhere you need a bit of bright Easter joy. Butt don’t think of it as Easter specific. It’s really more Spring in general.
Change up the colors and wouldn’t it be adorable in a nursery year round?
Mine has a hinged back, so I might stand it on an open kitchen shelf. or maybe on the console table in the living room. It would even be fun in the powder room.
I hope you have fun with this. Think of other seasons too! Of course clay gourds and pumpkins would be fun too! Snowflakes and pinecones. Hearts and flowers. There are so many options.

Oh this is so darling Diane! I just love those cute Peeps bunnies! Thanks for the great idea and all the tips, and Happy Easter!
Barbara, you are so sweet! I hope you make one and please share a pic!