DIY Easy, Colorful Bud Vases Centerpiece By Tinting Glass Bottles
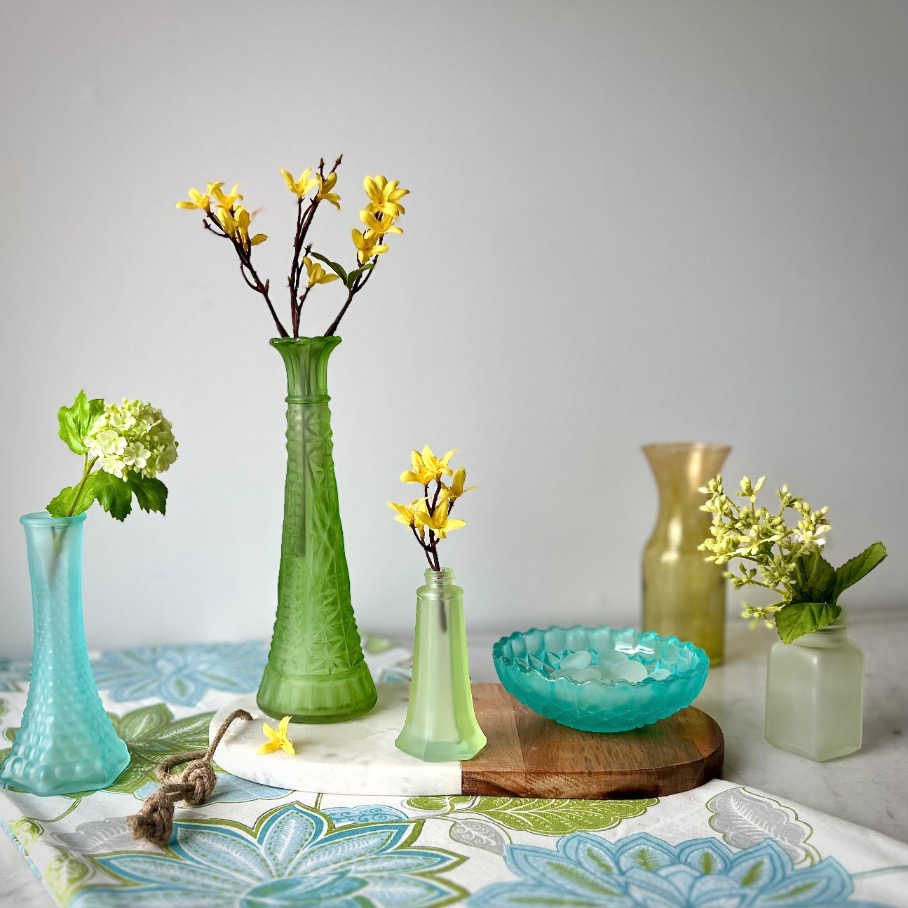
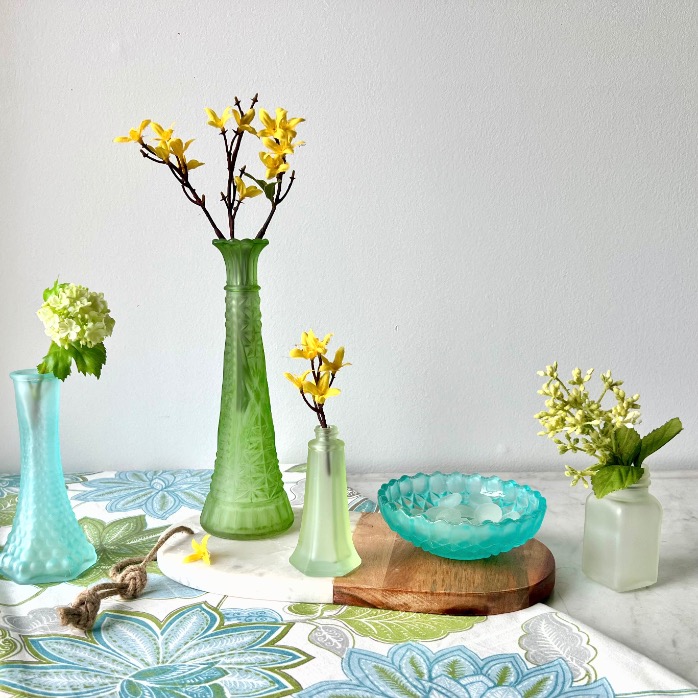
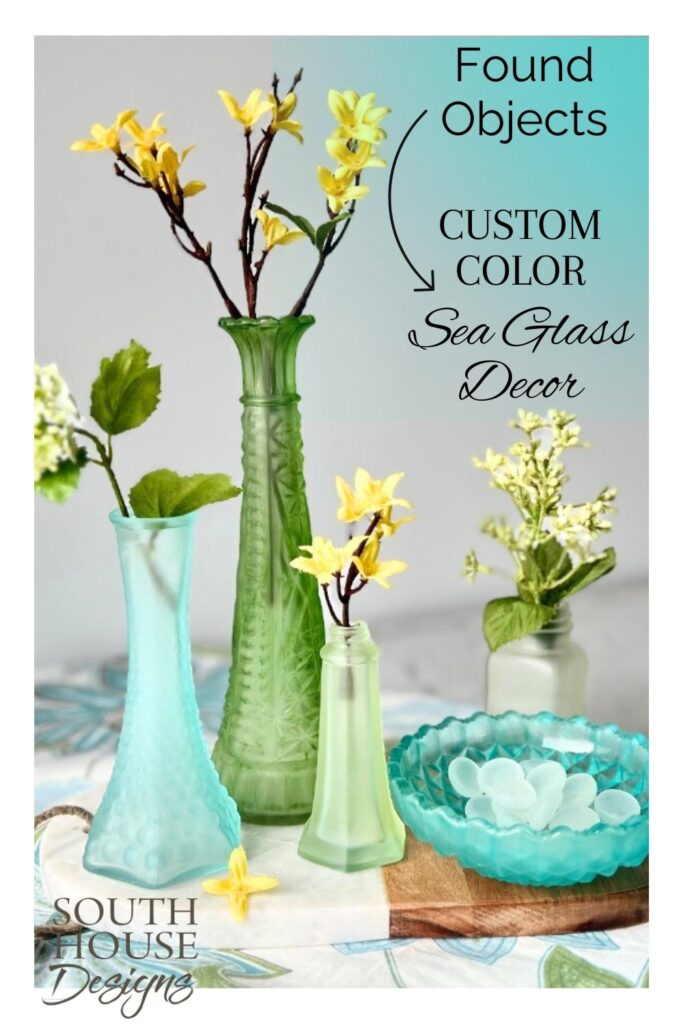
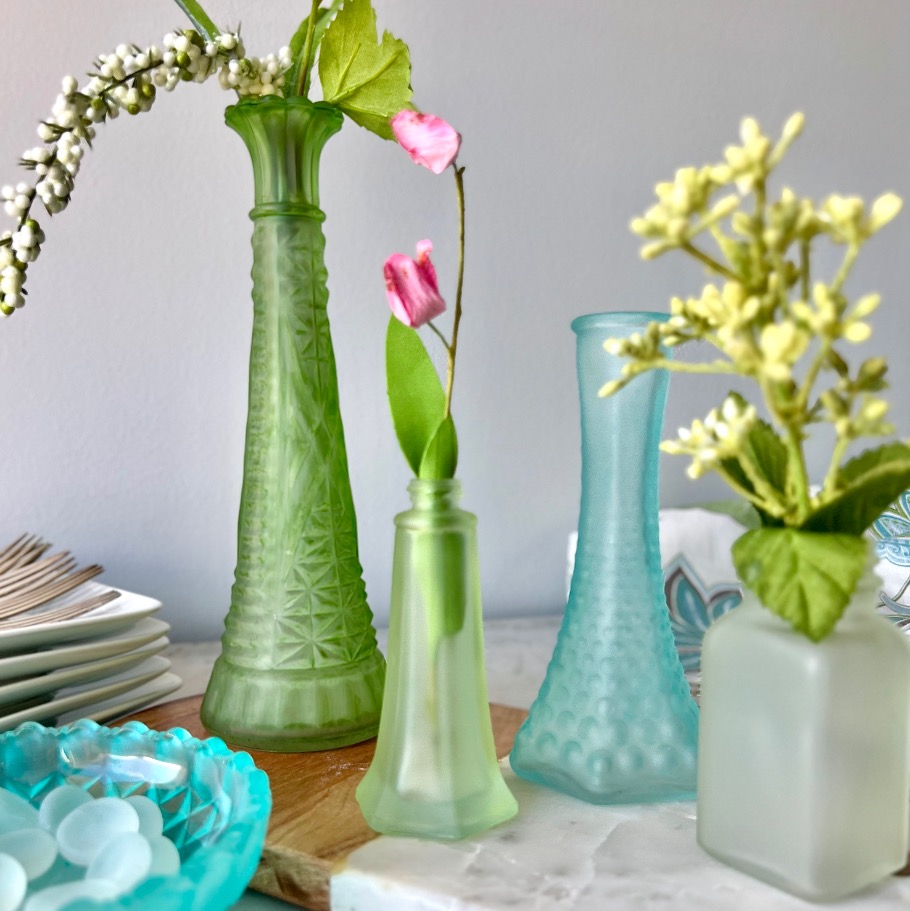
Custom-colored sea glass vase centerpieces from thrifted finds.
Easy DIY tinting technique. Perfect for weddings, parties, decor or season!
If you’re new here, hi!
I’m all about creative home decor, DIY projects, and sharing inspiration that makes your space feel uniquely you. Whether you’re a seasoned crafter or just looking to add a personal touch to your home, you’re in the right place.
Stick around and let’s create something beautiful together!
The Handcrafted Society: Where Creativity Connects
Every month, my incredible group of home decor blogger friends – led by the amazing Wendy from WM Design House – come together for a themed creative challenge. This month’s challenge? Manipulating glass in the most unexpected, delightful ways.
TABLE OF CONTENTS:
- The Handcrafted Society: Where Creativity Connects
- The Pinterest Inspiration (and Epic Fail)
- The Experimental Detour
- My Perfect Solution For Frosted Tinted Glass
- Curated-Over-Time Look for a Bud Vase Centerpiece
- Time to Tint Bud Vases and More!
- The Tinting Glass Process
- Durability and Flexibility
- More Projects to Love
The Pinterest Inspiration (and Epic Fail)
It all started with a Pinterest pin I saved years ago – you know the type.
They suggested using food coloring in Modge Podge swirled inside mason jars.
Spoiler alert? Total. Craft. Fail.
I didn’t give up. I tried the same concept with white glue, then clear Elmer’s glue. Each attempt was more disappointing than the last. The clear Elmer’s glue was the worst offender – tiny air bubbles everywhere and inconsistent color.
Plus I really wanted a water friendly interior for cut flowers and stems!
The Experimental Detour
Then I had my eureka moment: What if I painted the color on the outside? And somewhere along the way, I also detoured to frosted glass like sea glass.
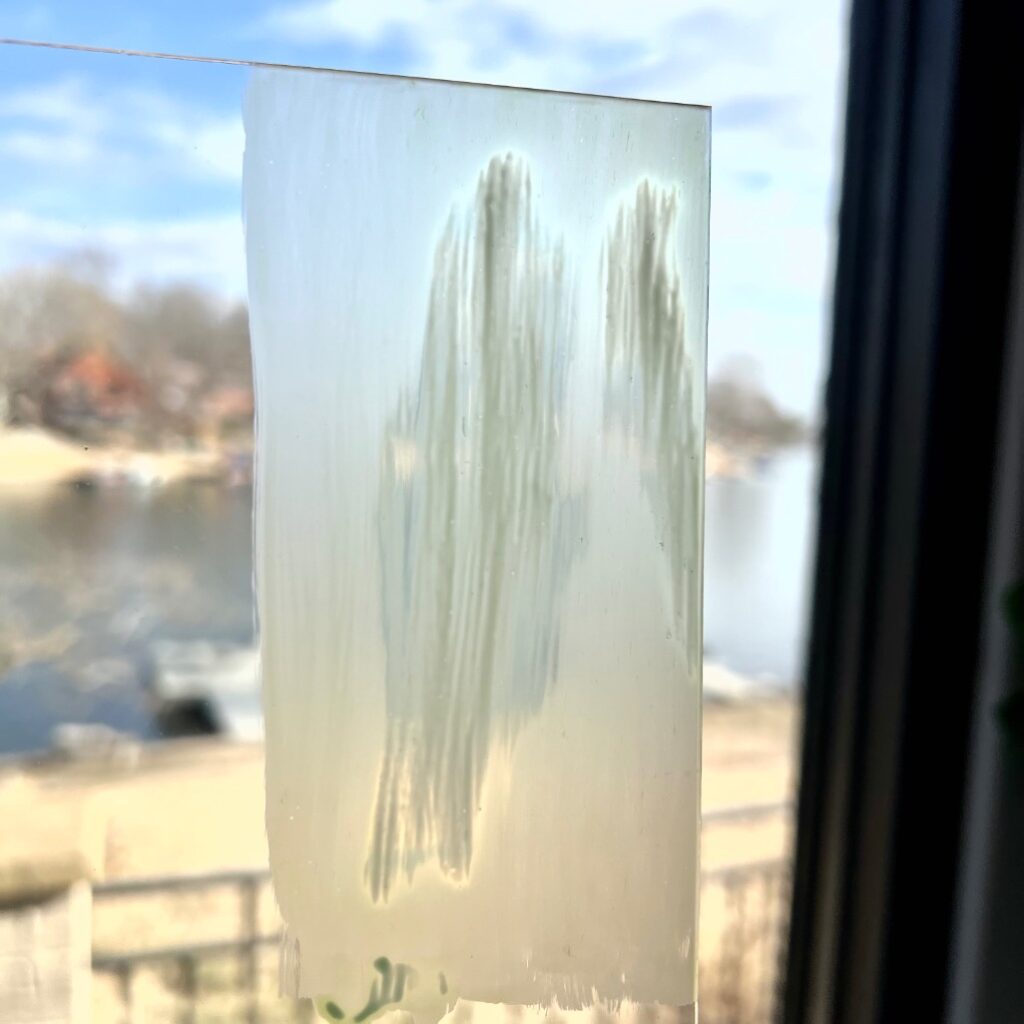
I first experimented with Modge Podge, rolling it in finely sifted baking soda for a sea glass effect.
It worked, but the surface was too thick.
It ends up my crafty friend Kim at Perfecting Places was on a similar path. She also converted to tinting the outside of her glass and perfected her transparent tinting technique.
But now, I was after something different. My detour took me in a slightly different direction.
Don’t you just love crafting serendipity?
My Perfect Solution For Frosted Tinted Glass
White glue was my game-changer. Yes, the simple, humble but mighty Elmer’s School Glue!
Painted on the outside, it dries with this dreamy, hazy frosted effect – instant sea glass in any color I want!
No baking soda needed, just pure crafty magic.
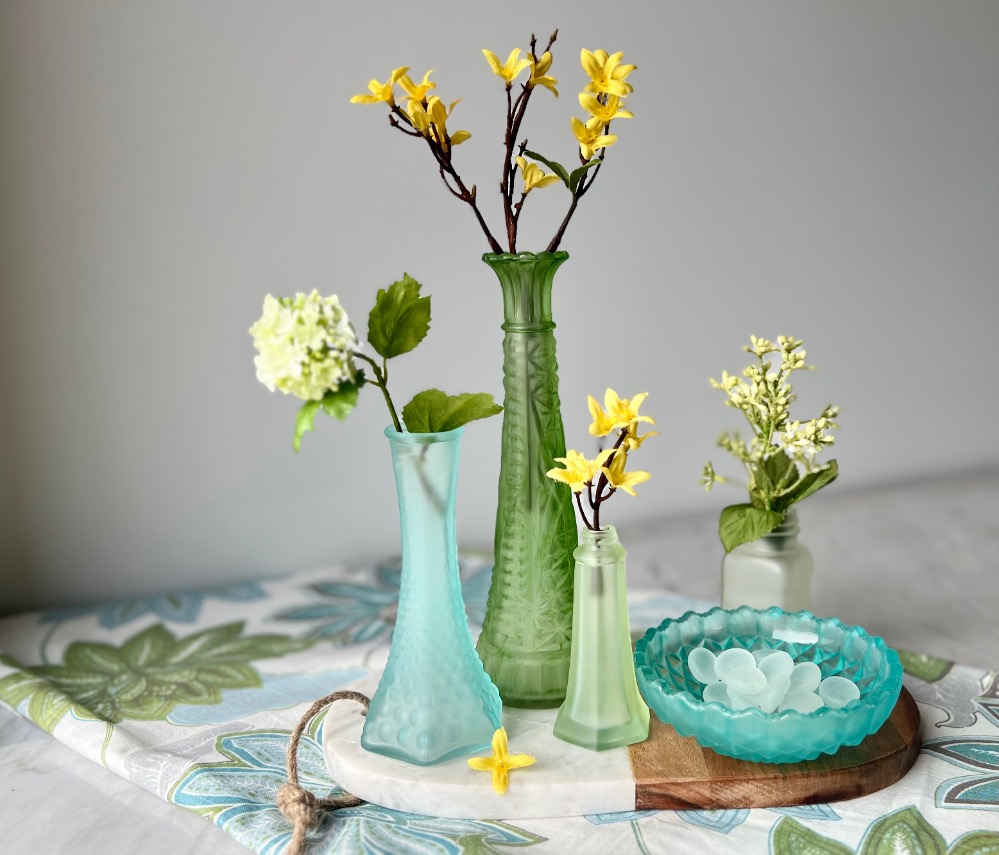
Curated-Over-Time Look for a Bud Vase Centerpiece
Pro styling secret? Mix your techniques!
Combine some vessels with Kim’s shiny transparent tint and others with my frosted finish.
The result?
A perfectly imperfect collection that looks like you’ve been collecting these gorgeous pieces for years.
Please excuse this quick pause in the action to ask if you are already a subscriber. If not, please consider joining this vibrant community of creative thinkers and doers! PLUS you get access to my free printables and resource library:
Time to Tint Bud Vases and More!
The Glass Vessel Treasure Hunt
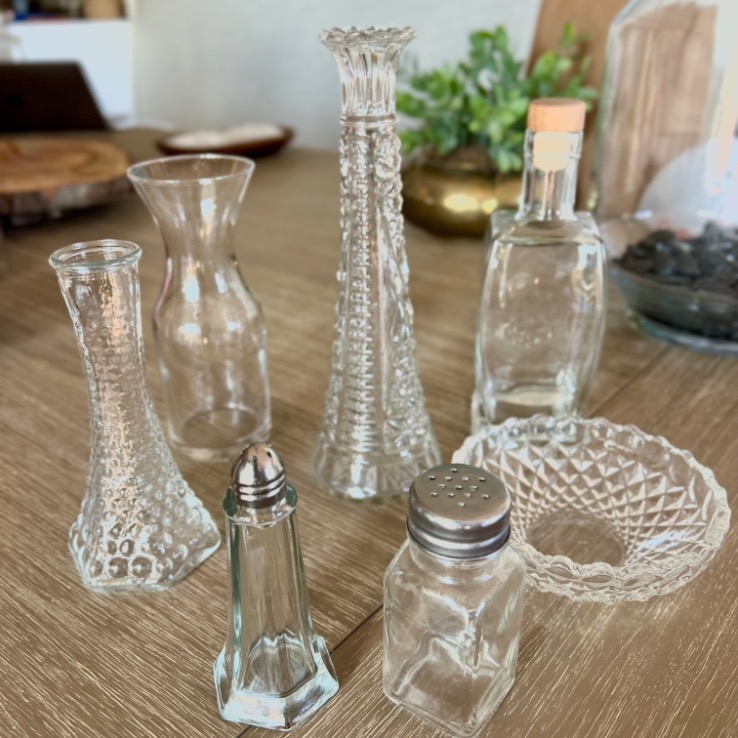
First things first: gathering your glass collection is half the adventure.
Forget matching sets – we’re going for eclectic charm! Raid your:
- Thrift store shelves
- Grandma’s cupboards
- Estate sale boxes
- Your bestie’s forgotten kitchen cabinets
PRO TIP: Look beyond traditional vases.
I thrifted a sleek salt shaker plus a boxy pepper shaker. Don’t forget old perfume bottles and liquor bottles. Small water carafe, interesting jars, even a small bowl all work well.
The key? Mix it up with different heights, different shapes, and different textures.
Materials and Supplies-
- White glue
- Food coloring (liquid works best, but I’ve got an easy workaround for gel)
- Artist paintbrushes (flat #14 brushes are magic)
- Isopropyl rubbing alcohol
- Disposable mixing cups
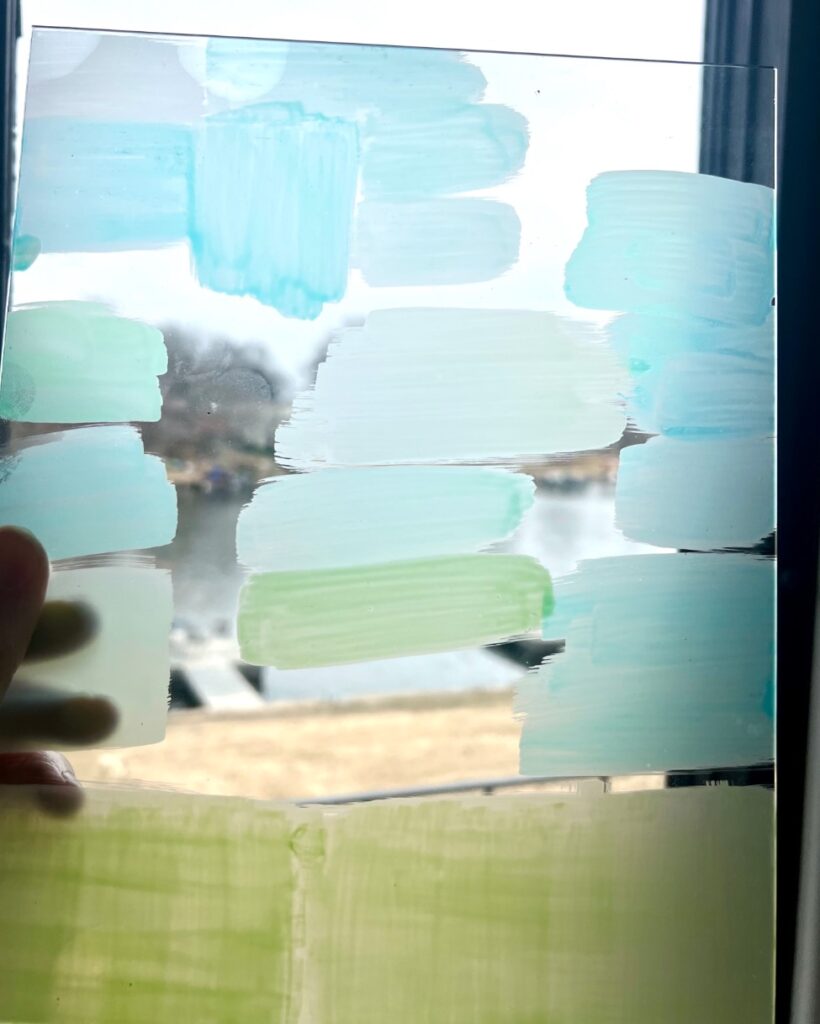
- Optional: An old picture frame glass for color testing
- Optional: Latex gloves
- Optional: a crafting lazy susan is helpful
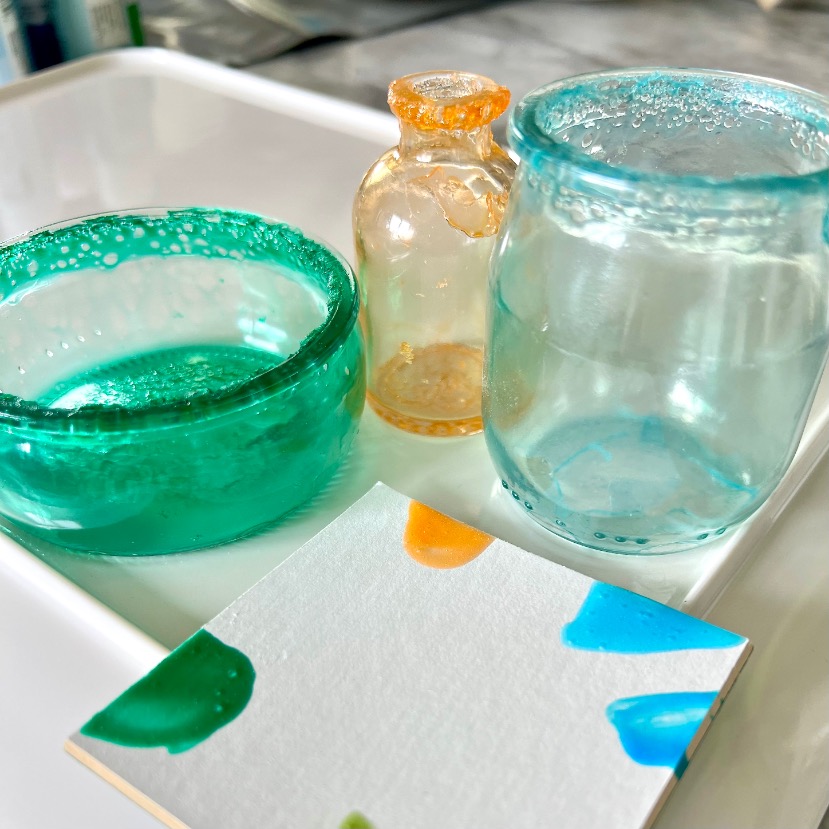
The Tinting Glass Process
Step 1) Prep Your Vessels-
Clean, clean, clean – Use rubbing alcohol to get every nook and cranny sparkling.
Step 2) Mix Your Colors-
Start with a teaspoon of glue in your mixing cup.
Add a drop of food coloring and mix thoroughly. The color will dry lighter than it looks in the cup.
PRO TIP: If using gel food coloring, dissolve in a bit of water first.
You’ll likely need to dilute the glue slightly for smooth painting, so the tinted water is perfect.
Test the color and the thickness of the glue on a piece of glass.
Adjust as needed.
Step 3) Paint Your Glass Items-
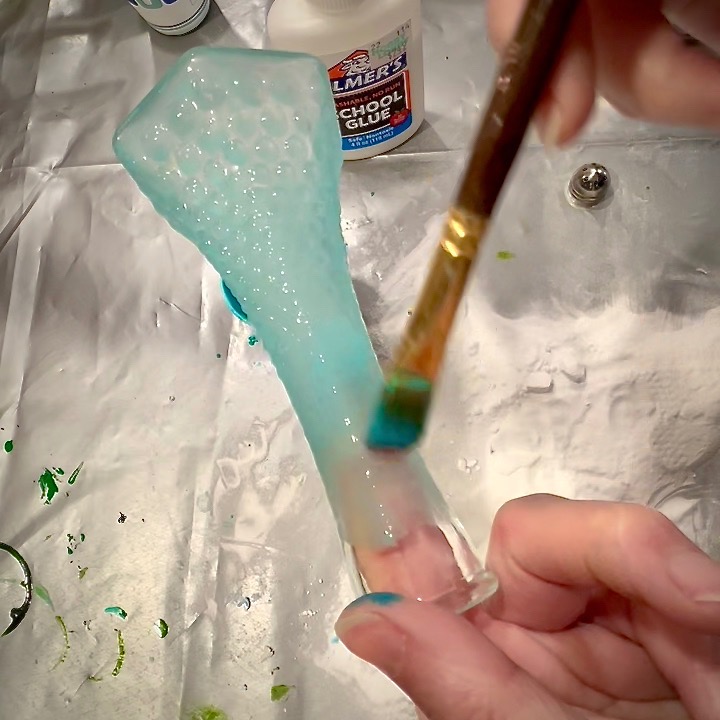
Once you have your glue ready, with an artist brush (preferably flat brush) and soft stroke paint your glass item.
Coating Tip:
- For embossed pieces, aim for complete coverage in one coat
- Smooth surfaces? Two thin, even coats are your friend
Brush Technique Mastery Tip:
- With your brush barely touch the glass surface
- Hold your wrist and elbow steady, use shoulder movement for consistent brushstrokes
- Move in a smooth, continuous motion
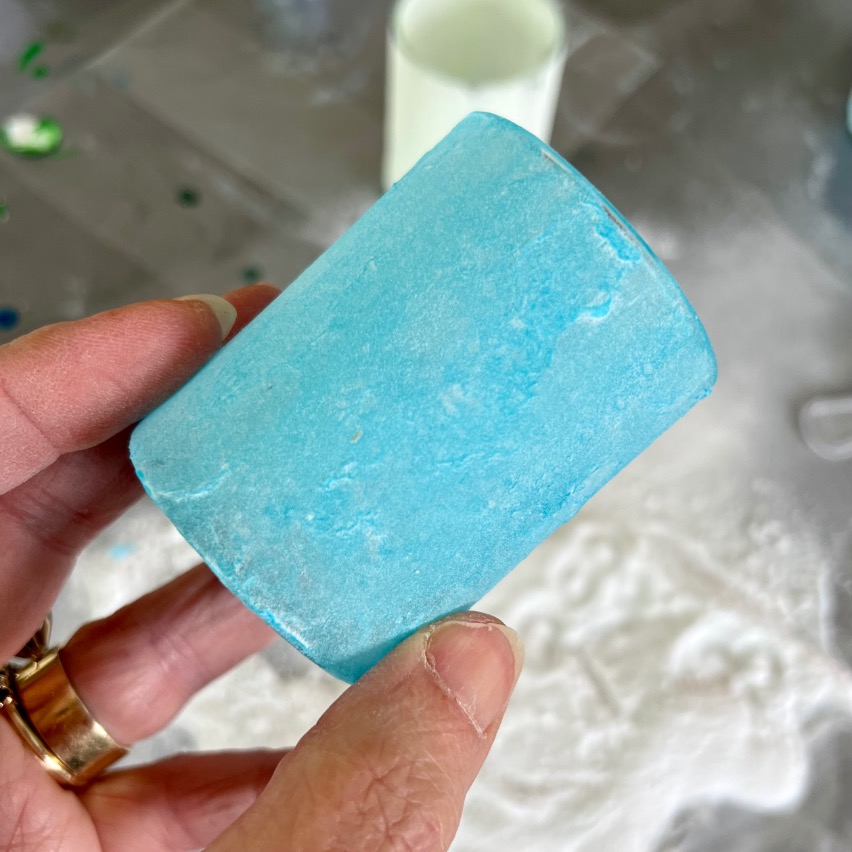
Durability and Flexibility
Real Talk: Glue on glass isn’t forever-proof.
- Not water-tolerant
- Recommended: If you want longevity, spray with a couple of thin coats of matte protective finish. Make sure it’s is matte.
The Fun Take: Total do-over potential!
- No permanent commitment = total creative freedom
- Unhappy with the look? Just soak in water
- Perfect for theme parties: Create bold 70s colors, then wash away
Bud Vase Decor — Your Way!
These tinted bud vases aren’t just decor – they’re mood makers! Match them to:
- Seasonal color schemes
- Your home’s palette
- An upcoming event
- Whatever makes you smile
Mix single stems, tiny blossoms, or go wild with varied florals. Each vase becomes a mini canvas of color and life.
This project started from a Pin I saved years ago, and now here’s a pin for you to save, so you’ll find it again when you need it most. Save it to a centerpiece board, to your vignette board, a seasonal board, crafts board or anywhere it makes sense for you:
As much as I love having you here, it’s now time to send you on to more fun glass crafting projects! They are all so amazing. Enjoy your time hopping to see each of these immensely creative gals.


Happy crafting, friends! Can’t wait to see your colorful creations. 💕🌸

Diane, your vases are beautiful! I love the matte milky finish, and I agree — pairing the matte finish with the glossy translucent pieces creates a beautiful collected look! Now, I’m going to try your technique to create some pieces to complement mine! Thanks so much for the beautiful inspiration!
Thanks Kim! I agree they are great companions for each other! Creative mind melds sure are fun!
Diane – You are an inspiration to me. I just love your tenacity! You never give up when you have an idea! The seaglass vases are beautiful and look lovely in your home.
Thanks bunches Lynn! You know I’m a puzzle nerd and crafting is like a puzzle to me, I love figuring it out 🥳
So cool Diane! I love the idea of it not being permanent and not having to bake it on! I will definitely try this!
Diane, these vases in all of my favorite colors are gorgeous. I love the frosted look. Absolutely love the idea of your matte finish with Kim’s glossy finish. The mix and match would look incredible.
Diane
These are so cute. What a clever way to add a vintage touch to glass.
Diane – These glass colors are beautiful! Of course, I love the colors you chose because they remind me of spring. Thanks for the tips and inspo (especially your discovery of using Elmers Glue). Definitely trying this in the near future.
The finish on these glass pieces is spectacular! Who knew that white glue was the answer? You are my favorite “Nutty Professor”…and I mean that in the absolute best way! You have taught to me experiment and try, try again when something doesn’t work. Beautiful job, Diane! Pinned!
I’m loving the soft color finishes on your vases Diane! I had no idea I could use white glue and food coloring to get the results that you did. You are amazing!
Gorgeous Diane! You are so creative!
Wow, Diane, you had a time with this one, but the result was fabulous! I would have never thought of using glue. What a genius you are!
Hi Diane ! Sharing this in my Unboxing post for March! Such a cute idea.
GORGEOUS tutorial, Diane!!
Don’t forget to join us over at the Creatively Crafty Linky Party every Wednesday through Sunday
https://creativelybeth.com/creative-crafts-linky-party-2/
Pinned!
Creatively, Beth
I love that you did all this experimenting so we don’t have to! Your beautiful glass tinting will be a feature over at Handmade Monday this week.
Oh that’s so wonderful, Julie! Thrilled & honored to be featured on Handmade Monday!