Half Bath Walls: Best Advice for Paper, Lights, Mirror!
Small space, BIG impact! BEST advice for wallpaper, lighting, and mirrors for your half bath. Get ready to transform your powder room!
“Small space, big dreams,” as every design enthusiast said at one time or another.
And that couldn’t be truer for half baths! These compact rooms have the potential to be bursting with personality.
Today, we’ll explore how to achieve that with the perfect combination of wallpaper, lighting, and mirrors. So do your creativity cap, and get ready to start dreaming of the transformation of your half bath into a space you love!
For the One Room Challenge, I recently embarked on a mission to conquer the sad, grey monster that had taken over our daughter’s main floor powder room.

Be sure to jump over to the ORC website and check out the other challenge-takers this season! There are some great projects coming right along.
In case you just dropped in, here’s a recap of how we got to this point:
The first three weeks, I shared the three basic, but critical steps I always take when preparing for a room makeover.
Designing and Planning
First Step – Wk 1 – Determining your goals for your makeover — starting with functionality and then adding style including general color palette
Next Step – Wk 2 – Refining and finalizing design choices — from flooring to wallpaper, to furniture pieces and specific paint colors
Third Step – Wk 3 — Planning and scheduling before installation — Planning aids for total project management to streamline the process, saving time, energy and money.
These are foundational steps, the core of good project management. Do NOT skip them.
Installation
Wk 4 — Easy Way to Make Custom Stacked Wood Molding — Streamlined, modern wall molding is just a jig away.
Wk 5 — DIY Guide to Chair Rail and Picture Frame Molding — Step by Step how to
So now that the lower walls are conquered. It’s time for the upper walls here at Week 6.
Let’s face it, half baths can feel a bit, well, half-hearted. But let’s fix that!
TABLE OF CONTENTS:
The links in this post may include affiliate links, which means if you purchase anything using these links, you pay no extra, but I may receive a small commission that helps keep this blog running. I truly appreciate you using affiliate links whenever possible. Please know that I will never recommend a product I do not believe in!
Wallpaper — Best Starting Point!
As we discussed in Week 2’s post, How to Best Choose Design Elements For a Cohesive Room Remodel, the order in which you decide on your design elements is important!
If you have a statement piece, a non-negotiable item, an heirloom that you want everything to revolve around, than that’s your starting point.
But without that, you should start with the element that has the most visual weight. In most cases, that will be the wallpaper.
Why Start With Wallpaper?
Focal Point Power: Let’s face it, half bath spaces can be a bit…well, small.
But what they lack in square footage, they can make up for in statement-making style.
And the key to achieving that? Wallpaper! It’s the undeniable star of the show in a half bath, instantly grabbing attention and setting the tone for the entire space.
Why Wallpaper in a Half Bath?
There are several reasons why wallpaper is a fantastic choice for your small powder room:
- Smaller Spaces, Bigger Impact: Because they’re a compact space, half baths offer a perfect canvas for bold or playful wallpaper patterns. Unlike a larger room where a busy wallpaper might feel overwhelming, a half bath can rock it with confidence
- More Than Just Paint: Wallpaper elevates your guest bathroom beyond basic walls. It injects personalityand reflects your unique style, creating a space that feels special and intentional.
- Budget-Friendly Statement: Compared to other design elements like tile or stone, wallpaper can be a more affordable way to create a dramatic visual impact.
What Will it Be, Chicken or Egg?
Now that you’re sold on the power of wallpaper for your half bath, the next step is picking the perfect pattern!
There are a two important elements to keep in mind from the outset: wallpaper placement and the powder bath proportions.
The wallpaper placement can impact the pattern. And the pattern can influence the placement. Pattern vs. placement; chicken vs. egg.
Same with the room proportions.
So let’s look at these two and how they impact proportions, then we’ll dive into patterns!
Wallpaper Placement Options-in Your Small Powder Room
There are several options for adding wallpaper to your bathroom walls. Which you choose, can impact your wallpaper pattern choice. OR, once your choose the perfect pattern, then you’ll decide the walls. It’s rather like the chicken to the egg. to set the tone, let’s explore where to hang it for maximum impact in your half bath:
- Full Monty: This is the classic approach, covering all four walls, and optionally the ceiling, in your wallpaper of choice. It’s a great way to create a truly immersive experience and allows the pattern to be the star of the show.
- Accent Wall: For a more subtle approach, consider using wallpaper on a single accent wall. This can draw the eye and add a pop of personality without overwhelming the space. Choose a wall that’s the focal point when you enter the room, perhaps behind the sink.
- Half Wall Magic: A fun option and popular look is to wallpaper only the top half and paint the bottom half of the wall. This creates a unique visual interest and can add a touch of whimsy.
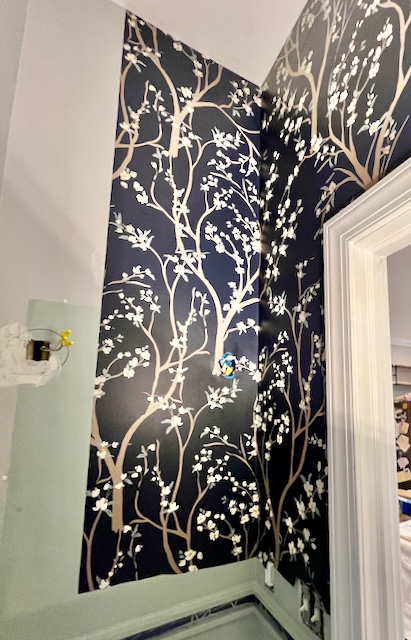
In Our Case:
Our overly tall, skinny half bath needed to be split horizontally to add the illusion of width and break up the height. So we knew from the beginning we would be implying some Half Wall Magic.
Proportion Play: The Wallpaper Illusionist-
One of the hidden superpowers of wallpaper in a little space like a downstairs half bath is its ability to create the illusion of a different size or shape. Here’s how to use it to your advantage:
- Vertical Stripes: If your half bath has a low ceiling, consider using wallpaper with vertical stripes. The elongated lines can create the illusion of a taller space, making it feel more airy and open.
- Horizontal Drama: For a narrow half bath, horizontal stripes or a wallpaper pattern with a strong horizontal flow can trick the eye into perceiving a wider space. Using the wallpaper on half the wall with a high contrast wood wall treatment below will also break a too tall wall and widen a too narrow room.
- Play with Scale: Remember the tip about avoiding large motifs in a small space? However, a tiny bathroom is a great place to turn that long standing “design rule” on its head. A statement-making wallpaper can give the room presence, making it feel larger.
- Play with Color: Keep in mind, dark colors tend to recede, so dark-colored wallpapers can give the sense of more space. I know it seems rather counter-intuitive. It works because the corners of the walls that define the size, tend to disappear with dark paper or paint, so it feels larger.
Choosing Your Perfect Pattern-
The next step is picking the perfect pattern! Here are some tips to get you started:
- Consider the Vibe: Think about the overall feeling you want to create in your half bath. Do you want it to be relaxing and spa-like? Energetic and playful? Dark & moody? Cool retro MCM? The pattern you choose should complement that vibe.
- Existing elements: Are you working with any existing design elements like the floor or vanity? Keep these in mind if you are.
- Think About Scale: Because half baths are small, some say to avoid overwhelming patterns with large motifs. Some profess otherwise. I say that a powder room is the perfect place to toss that theory to the side. This stand-alone small room is a great place for bold decor ideas.
- Don’t Be Afraid of Color: Half baths are the perfect place to experiment with color! Even if the rest of your house has all white walls, the powder bath can be a great place for a pop of color. Whether a bold wallpaper, a geometric wallpaper or a soft watercolor floral wallpaper, pick a pattern with the vibe you’re going for that you love.
PRO TIP: Sharply defined lines, particularly in a predictable, repeating pattern are more noticeable if not matched perfectly.
If your walls and corners are not perfectly straight (and rarely are they), and if you are hanging the paper yourself (assuming you are not an experienced pro) keep in mind the above tip.
If a pattern has sketched, imperfect lines or more fluid, watercolor type lines, any seams slightly off in matching up are less noticeable.
Can we pause a moment for me to ask if you are finding this post helpful. There is so much more still to come. Please consider subscribing so you don’t miss a thing — and have access to all the exclusive content I share with my subscribers only.
Thanks so very much! Now, back to our half bath walls:
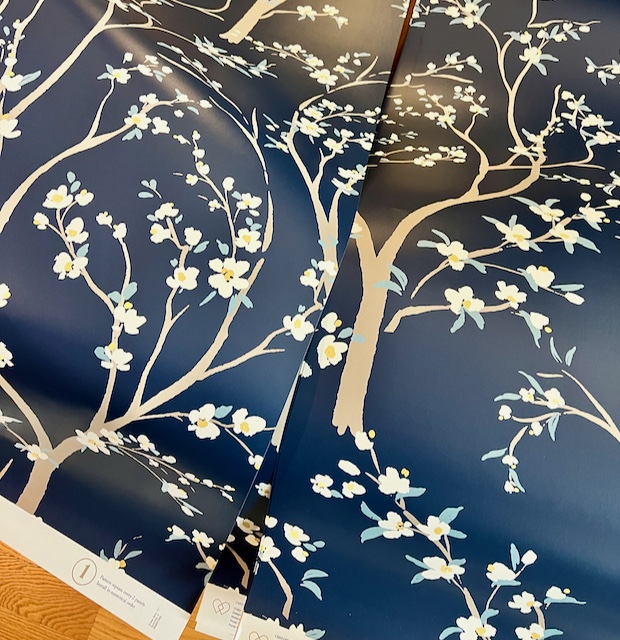
Another super cool feature of our wallpaper from Love Vs. Design. It came in panels, printed to our length. And the panels are numbered. Our pattern had two panels before it repeats.
The panels were clearly marked 1 or 2. I hung a number one, then a number two, then back to number one. So the pattern repeat is 48-inches across. It gives the feeling of almost a custom mural, not a small repetitive pattern. I love this!
Our Wallpaper-
I am thrilled to have collaborated with Love Vs. Design for the wallpaper in this powder room!!!
After getting swept up in the whirlwind of all the fabulous wallpaper options at Love vs. Design, we knew we were in for a treat.
Their incredible selection offered something for every style, and the best part? Each design could be customized in over 200 colors for each element!
This level of personalization was a game-changer, allowing us to find the perfect pattern that matched our vision and existing decor.
To narrow down the choices, our kids took advantage of Love vs. Design’s fantastic custom sample service. They offer generously sized samples, so you can truly get a feel for the pattern, color, and texture in your own space. We ordered 6 samples (because, well, deciding is hard!).

The samples arrived — early, by the way!!! When does that ever happen, anymore? They taped them up (since we did not go with the peel and stick variety), moved them around and played with paint colors.
Seeing the tow cherry blossom patterns in their home, they instantly knew they wanted the strong image of the trunks, vs. just the slender branches.
They also instantly knew the on-a-whim darker color was actually their favorite.
They called and sent pictures and everyone was thrilled.
Why They Chose Blossom Orchard-
The kids do not like fussy and their house, an historic DC row house, features heavy, strong design elements, nothing delicate. As explained in more detail in an earlier post.
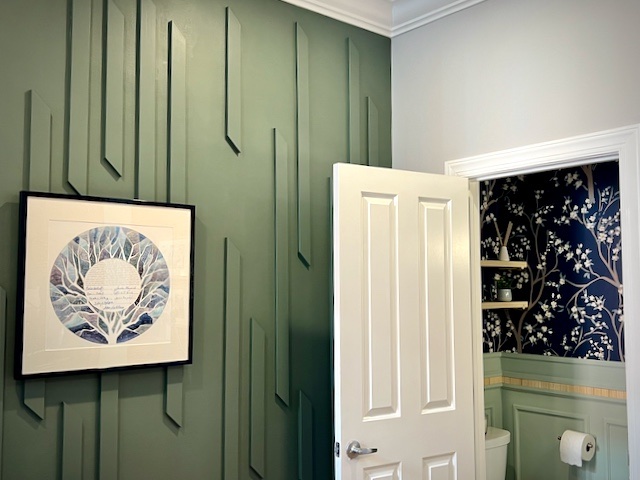
As they scrolled through the vast library of Love vs. Design patterns, Jon suggested a cherry blossom for their importance to DC and to reference their prized tree artwork that hangs right outside the bathroom door.
The kids narrowed down the patterns to two geometric patterns (Katie’s first thought) and two different cherry blossom patterns.
The Blossom Orchard pattern is a non-fussy floral that emphasizes strong structural trunks and branches which spoke to the exposed brick walls and strong structural design elements throughout their home.
It also brought some soothing balance of curves to a space heavy with angular lines.
They wanted a moody blue color for the background. And thought they knew exactly which color they wanted. But on a whim, Katie ordered one of the samples with the darker “Notable” color.
By now, you know the winner!
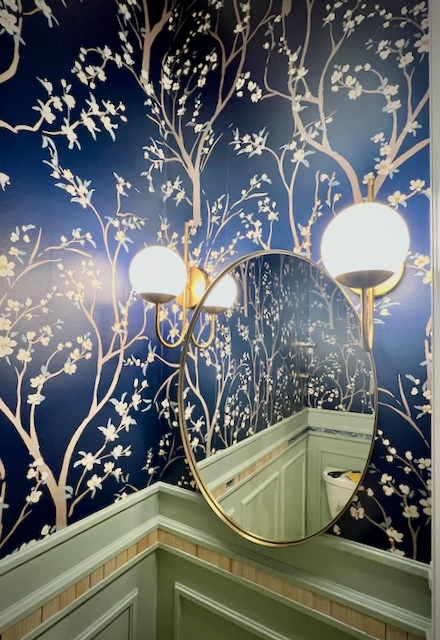
Pattern: Blossom Orchard with Notable for the background, Ash for the branches and faux gold, light and sky as the other elements.
Now that the paper was finalized we could move on in the decision making.
Wallpaper Installation: Easy Does It!
I know, everyone is gaga over peel & stick wallpaper.
But I much prefer traditional wallpaper! Oh don’t get me wrong, there are a few spaces I will use peel & stick, like rentals and small areas where I want seasonal changes.
I’ve struggled with two feet firmly planted on the ground, just getting a 3 x 6-INCH screen cover to line up squarely with no bubbles. A 2 x 9-FOOT piece of “screen cover” while teetering on a ladder is not a fun walk in the park!
The ‘new’traditional wallpapers (I know, quite the oxymoron) are such a breeze to hang.
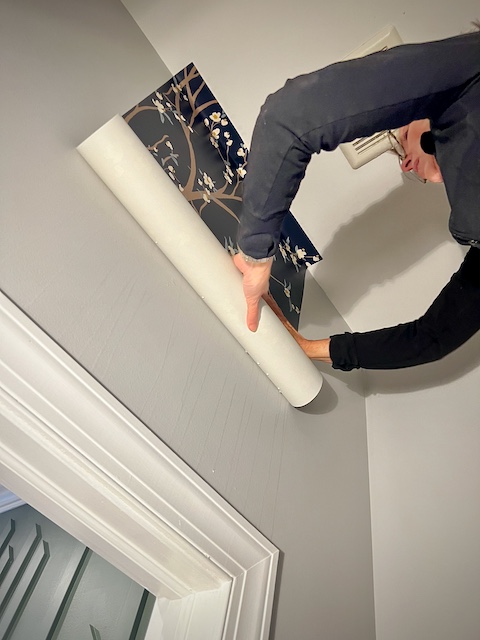
My biggest anxiety about the entire powder room makeover was how I would hang this wallpaper in such a tiny spot with a really awkward ladder situation.
My anxiety was totally for not. The wallpaper is incredible quality making the installation the easiest EVER!. The ladder, not so easy! But I got her done!
The last time I hung pre-pasted wallpaper, it was when you had to use a trough or bathtub to dunk the roll and then book fold it to let the glue activate — and then sometimes the paper would shrink a bit and sometimes if you overworked it, it would stretch.
I know, I just aged myself!!! But if you are from my era, you remember those days.
Pre-pasted wallpaper is new–again! (At least this paper from Love vs. Design is).
It is sooo improved. I can’t wait to paper another room — even a ceiling!
When I opened the box from Love Vs. Design (which arrived almost a week early b-t-w), they had included the niftiest little, soft squeegee that worked like a dream and you just use a spray bottle of water. Other than that, I just needed a box cutter and straight edge.
Lighting: Ditch the Dreaded Overhead Bar
Let’s talk about the standard bathroom light fixture: the dreaded overhead bar fixture.
While it might seem like a practical choice, don’t do it!!! Can you tell they are my pet peeve!
You can change the shades, you can change the finish. But you’re just putting lipstick on a pig.
No matter the shade, no matter the finish, they are still overhead bar lights, that just do not work when it comes to creating a truly inviting and flattering space. Here’s why:
- Shadow Play: Nobody’s Friend: Those harsh overhead lights cast unflattering shadows on your face, making even the most basic tasks feel like an uninspired audition for a horror movie. Not exactly the vibe we’re going for in our half baths, right?
- Beyond the Essentials: Even though half baths aren’t necessarily makeup havens, good lighting is still essential. It helps you see clearly, truly elevates the room, creates a more spa-like atmosphere, and sets the mood for the whole bathroom.
Enter the Flattering Duo: Wall Sconces & Hanging Pendants-
When it comes to achieving a more flattering and functional light source in your half bath, wall sconces and hanging pendants are the clear winners. Here’s why:
- Side-by-Side Brilliance: By placing a sconce or pendant light on either side of a mirror, closer to face height, you create a soft, diffused light that washes away those harsh shadows. This makes getting ready a more pleasant experience, even if it’s just a quick refresh.
- Ambiance on Point: Wall sconces and pendants offer a warm and inviting glow that elevates your half bath from a utilitarian space to a mini oasis.
- Space Savings (Especially in Narrow Half Baths): In a narrow half bath, a central overhead light can feel bulky and visually constricting. Wall sconces and pendants, on the other hand, free up space and can actually make the room feel wider by drawing the eye outwards.
PRO TIP: Double Up for Double the Impact! In a narrow half bath, don’t be afraid to install two sconces or pendants, one on either side of the mirror. This creates a more balanced and symmetrical look, further enhancing the feeling of spaciousness.

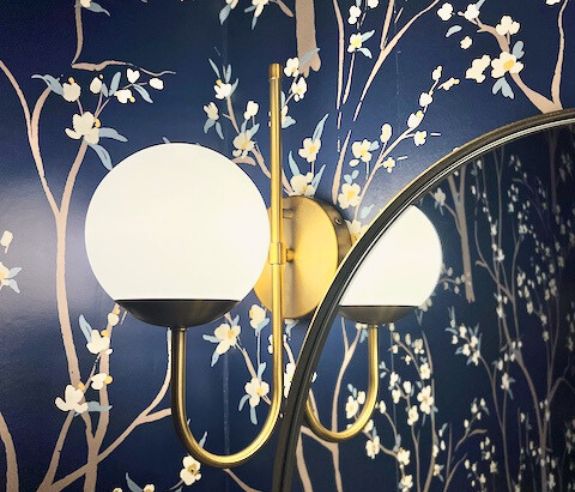
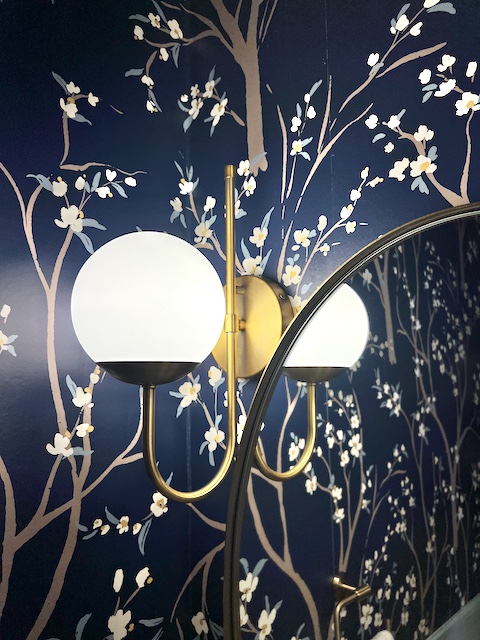
Our Lighting-
Why it works: The aged brass finish, the graceful curves, the globe is a modest 6-inches so room for two in our scant 30-inch wide bathroom.When I sent the kids to Lights.com to see if there was anything they liked. No hesitation. They were all about the Castell curved arm wall sconce in aged brass.
I’ve collaborated with Lights.com previously on their phenomenal real wax flameless candles. But oh my, their fixtures are gorgeous, too!
Personally, I love that the bulbs are completely covered. I find that exposed bulbs can often be harsh especially in confined areas. A soft glow is what we wanted, and the Castell delivered beautifully! Plus they are a great price for their quality!
Mirror Magic: The Perfect Shape for Your Half Bath
When it comes to mirrors in your half bath, there’s more to consider than just reflection. The shape of your mirror can play a big role in the overall feel of the space, especially in a compact half bath.
Let’s say goodbye to the stark lines of a traditional rectangular mirror and embrace the softer touch of ovals and arches!
Why Ditch the Square?
While rectangular mirrors are perfectly functional, they can sometimes feel a bit boxy and overwhelming in a small half bath. The sharp corners tend to emphasize the angular lines of the room, making it feel even more confined.
The Allure of the Oval-
Oval mirrors offer a gentler alternative. The soft, curved shape creates a more relaxed and inviting atmosphere. They visually elongate the space, making the ceiling appear higher and the room feel more open. This is particularly beneficial in a half bath where square footage might be limited.
Arched Appeal-
Arched mirrors add a touch of elegance and sophistication to your half bath. The curved top softens the lines of the room, similar to an oval mirror, but with a touch of classic flair. They’re also perfect for maximizing space utilization, as the arch allows for sconces to be mounted flanking the mirror up high without compromising its functionality.
PRO TIP: If you like the clean-lined modern look, and want to look beyond a framed mirror. A frameless mirror can be a great option, just be sure to go with a bevel edge, otherwise it screams cheap, builder grade.
In a full bathroom where teeth brushing and flossing is a primary function, the mirror and frame will be cleaned frequently. Keep that in mind when choosing frame.
This is why I went with frameless, but elegantly arched, beveled wall mirrors behind our sinks in our primary bath.
PRO TIP: If you have or fall in love with a more delicate framed mirror, consider giving the frame a couple of coats of sealer to protect its finish from the workout it will get.
In our last house, because our boys’ bathroom was also the hall bath that guests would be using. I went with a framed mirror with a more elegant metal leaf finish. I gave the frame a couple of coats of sealer and it held up beautifully — for 15 years.
Bonus Tip: Consider Scale-
When selecting your oval or arched mirror, keep the scale of your half bath in mind. An oversized mirror can overwhelm the space, while one that’s too small might get lost.
Choose a mirror that’s proportionally balanced with the size of your vanity and walls. Scale of any frame mirror also applies to the visual weight of the frame itself.
The Perfect Match: Function Meets Flattery
By opting for an oval or arched mirror, you’re not just achieving a softer aesthetic; you’re also creating the perfect canvas for flattering wall sconces. The space above the curved edge allows for sconces to be placed at eye level, bathing your face in soft, diffused light. This eliminates those pesky shadows cast by overhead fixtures and makes getting ready a more pleasant experience.
So, ditch the boxy look and embrace the magic of ovals and arches! They’ll add a touch of softness, create the illusion of more space, and allow for functional and flattering sconces, all while contributing to the overall style of your half bath.
Within the categories of oval and arched, there are loads of options. You can certainly still have a little fun with a funky mirror in a bold color, if that’s on your wish list.
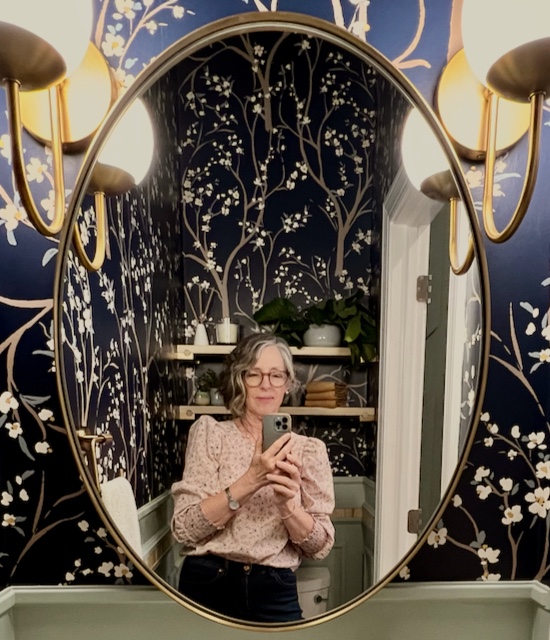
Our Mirror-
Now that the wallpaper pattern is chosen and we’re adding some other wall detailing, it became apparent that a minimalist mirror frame would be best paired with the stream-lined light fixtures.
It didn’t take long to find the perfect mirror — and it even came in two sizes and multiple finishes. We picked the smaller size of 22 x 30 in the aged brass.
This is a prime example of why we start finalizing our design decisions based on their visual weight or importance.
In bathrooms, particularly half baths, the walls are proportionally more significant to the rest of the room, so it is definitely worth any extra effort to add style and personality to the walls.
Someday, your half or full bath will rise to the top of your list. Be sure to save this so you can remember it:

Be sure to check back next week. I’ll be sharing two builds I did for this bathroom — a vanity table and a pair of really distinctive built-in shelves.
I hope these half bathroom ideas, advice and tips for your walls have been helpful. As always, I love hearing from you and are available for all questions you may have.

I remember wallpapering the bathroom in your first home! Babes in the woods!
What great wallpaper, Diane. And I love all of the other details you chose. What a lucky daughter! I am sure she is in love with her new bathroom.