Hanging Above the Rest: Build these chic, modern shelves for a bathroom upgrade that’s totally shelf-made, by you!
Bathroom Shelves: the Land of the Overlooked Bracket?
Not on my watch!
There are three main camps when it comes to the unsung heroes, shelf brackets:
- Team Invisible: Floating shelves with zero hardware are the ultimate in sleekness. (My kids, who requested a floating library wall, are all in on this!)
- Team Practical: Brackets are just there to, well, hold shelves up. Functionality over fancy, right?
- Team Statement Piece: Shelving hardware can be more than just functional. It can elevate the entire design!
I bet you can guess which is my camp!
If you’re with me and believe shelves deserve better than boring brackets, then keep reading for a DIY project that’s both functional AND beautiful.
And even if you’re a die-hard “No Hardware” devotee, stay tuned! This project might just change your mind… a little.
Sidenote: This bathroom makeover is for two of our kids, the same kids that wanted an entire library wall of floating bookshelves — all solid slab wood with no visible hardware. And it turned out fabulous!!!
I had to work to win them over to Team Statement Piece.

TABLE OF CONTENTS:
The Problem, My Solution
We needed modest storage for a few bathroom necessities. It’s a half bath, so really just extra toilet paper and extra towels, hand towels at that!
We had an empty wall. So a small shelf or two above the toilet was the perfect solution.
Yes, simple shelves, like floating shelves would have worked well and looked fine.
But I don’t like to settle for “fine” when we are planning a makeover.
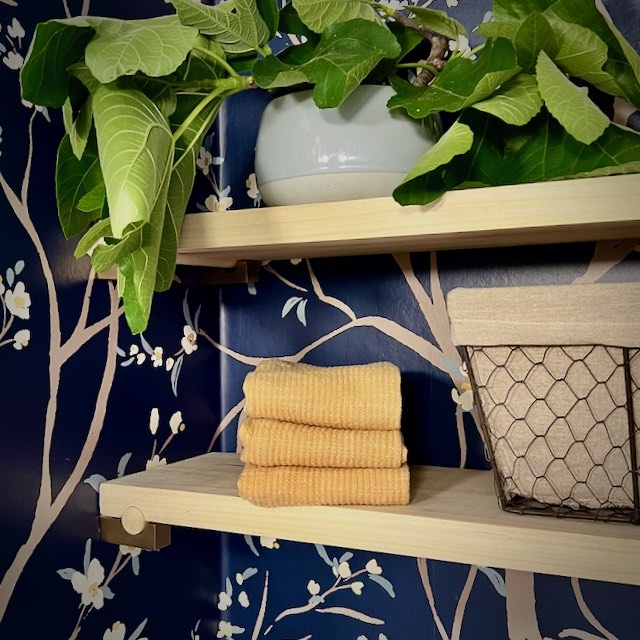
I wanted to DIY bathroom shelving with statement hardware that would double as a stylish accessory.
These above-the-toilet shelves are the perfect project to add a modern look with unique hardware and a touch of DIY flair.
More Than Just Storage: Designed with Intention

These shelves go beyond just providing extra storage space in the half bath.
They were designed to contribute to the overall look and feel of the room in a few key ways:
- Balancing the Glam: I wanted to distribute a touch of gold throughout the entire bathroom, and the gold “brackets” holding the shelves helped achieve that by echoing the gold of the lights, the mirror, the faucet, the pop up drain and the towel ring that are all on the sink wall.
- Uniquely Them: I also wanted to avoid anything ordinary, and the unique application of the hardware adds a special touch that reflects the uniqueness of the kids’ style.
- A Touch of Softening Curves: Finally, I felt the room craved a curved element on this wall to counter the straight lines of the chair rail blocks and the picture frame molding. The small, but very striking circular element on the brackets subtly introduced that curve.
How to Make Unique DIY Bathroom Shelves
The links in this post may include affiliate links, which means if you purchase anything using these links, you pay no extra, but I may receive a small commission that helps keep this blog running. I truly appreciate you using affiliate links whenever possible. Please know that I will never recommend a product I do not believe in!
Materials and Supplies-
- Wood, I used birch 5/4 lumber**
- Wood dowel, 7/8-inch
- Sealer, I used Varathane’s Spar Urethane (exterior grade, water-based)
- Monument Robe Hooks from Amerock. four per shelf
- 1/8 x 2-inch Toggle bolts, two per hook
- Circular saw or table saw
- Orbital sander and sandpaper, this is a great price on this set
- Router, this is mine
- 7/8-inch box core bit, this set was super inexpensive and worked great!
- Scrap lumber, some same thickness as your shelf
- Pencil and Straight edge
- Clamps, these are my favorites!
- Paint brush
- Level
- Screwdriver
- Hammer
- Ruler or tape measure
**SUGGESTION: Substitute reclaimed wood with black hooks for a more industrial, rustic look, or a farmhouse style small bathroom.
A Word About My Statement Hardware (and a DIY Lesson)-

This project is a testament to the power of reimagining hardware! Here, I used Amerock robe hooks as shelf brackets for a unique look. I had also used them as the perfect brackets to hold a Christmas stocking rod on a mantel slipcover.
While I fully encourage DIY creativity, it’s important to remember that using items outside their intended purpose can lead to unforeseen challenges during installation.
In this instance, the plastic anchors included with the robe hooks were problematic. As many DIYers know, encountering issues is part of the process, and it often requires some creative problem-solving on our part. And in this case, the brand stepped in to help out.
What truly sets a brand apart is its response to those challenges.
I reached out to Amerock about the installation difficulties, and I was blown away by their commitment to customer satisfaction. They not only acknowledged the issue but also dedicated two engineers to develop a solution specifically tailored to my project. They even provided a comprehensive guide to walk me through their solution with pictures and all.
With Amerock’s permission, I am including their guide in the following tutorial.
Step-by-Step Instructions-
Step 1) Cut Your Wood to Size-
While still at home in KC, I started by ripping our board to the desired finished depth of 7-inches.
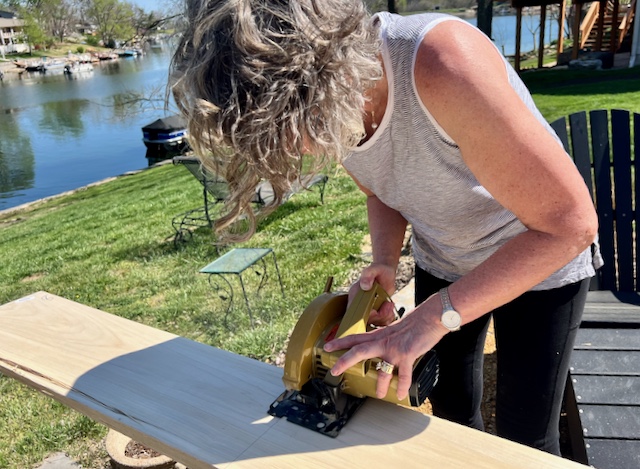
Then I cut it crosswise a bit longer than I knew we needed, but short enough I could transport it on the plane to DC where our daughter lives.
Once in DC, I measured, and measured and checked it again and then cut the final lengths of wood.
For us, one of the corners was fairly close to 90-degrees, the other not so much. So for a perfect fit, I measured across the back wall and then took another measurement 7 inches out — the depth of the shelves.
I marked the two measurements on the shelf board, drew a straight cutting line between them and cut.
PRO TIP: With a miter saw, if you need a slightly “off” angle, lower the dis-engaged blade down to the board, adjusting the board until your blade line is along your “off” cut line. Slip a shim between the board and the fence to hold this angle.
You are probably not doing a long-distance reno, so you can just rip your board and then take your prices measurements. Mark and cut your wood to fit wall to wall.
REMINDER: Be sure to test fit your cut boards before moving on to the next step.
Quick pause in the action: Are you enjoying this post? There’s a lot more and even exclusive content for subscribers. And there’s no time like the present, right?:
Many thanks! Now back to our shelves:
Step 2) Add Groove to Bottom of the Shelf-
If you are wanting to expand your power tools, and a router is on your list, this is a great beginner routing project!
It’s just straight lines that extend beyond the length of the woods — the easiest routing lines to make.
This was my first router project ever!
And now I’m wondering why I let this fun power tool scare the living daylights out of me! My head is dancing with all kinds of applications and ways I want to use it for future projects.
After reading all the reviews and doing a ton of research, I bought this relatively inexpensive router from Ryobi. I’ve been very happy with all my other Ryobi tools and I have the batteries, so best to stay with the same. It did NOT disappoint! Wow! amazing little tool!!!
Practice and Test Run First-
To get started with a router, watch enough YouTube videos to make you comfortable with some test runs.
For me, the biggest hurdle was how to set up my boards and clamp them securely. Once I had that down, it was smooth sailing!

PRO TIP #1: Always route from left to right!
PRO TIP #2: Clamps are your routing best friends!!!
PRO TIP #3: Clamp your wood with scrap pieces the same thickness on each end of the routing line. On the left side, leave a gap at least the thickness of your bit between the scrap and the shelf wood.
The extra scrap on each side assures you keep the router level as you enter and exit the cut. At the entry point, you want to get your router at speed before engaging with the wood, the gap on the left side lets you do that.
Figure Placement of Rail-
PRO TIP: It is almost always more accurate to measure from the edge of the bit to the outside of your router base plate rather than measuring from the center of the bit.

I’ll share the particulars of my installation, You’ll need to adapt it for the hardware you might be using and the router model you use.
With this bit and a Ryobi router, edge to edge measured 1- 5/16-inches.

The robe hook needs to sit tightly to the wall, but the wood shelf will have a tiny bit of play between the walls. So slightly off-setting the hook along the side of the wood I marked the outside edge (farthest from the wall) of where the bit should carve out the groove.
And then repeated on the other side and used a straight edge to mark this line. This is the planned outside edge of the semi-circular channel.

Next, I drew a line the 1 and 5/16-inch (distance between the edge of the bit and the edge of the router base plate) away from that groove line.
This line is where I clamped another scrap piece of wood to serve as my rail to run the router against.
Time to Rout Out The Groove-

This is a relatively large bit and channel to be routed out, so I did it in 6 – 7 passes. With each pass, I brushed off the sawdust and I lowered the cutting bit a bit more.
As I got close, I tested the depth with the dowels to make sure I didn’t cut too much away.
Step 3) Finish the Wood-
Now it was time for a final sanding and sealer application to both the shelves and the dowels.
As much as our kids are not fans of a very matchy-matchy home decor, in this small bathroom, we accentuated the custom look by keeping all the wood elements the same.
The original plan was for the dowels to be a darker stain color or maybe even paint them black. But as the room came together, we decided a simple design was a better design.
Any color stain or even a paint color wash with a top coat would be a great look.
Step 4) Installation–
Determine the height for your shelves and mark the wall carefully. On this dark wallpaper, I used pieces of painter’s tape and marked the exact spots on them.
Of course, we tried to catch wall studs whenever possible. But where wall studs don’t line up for this sort of shelving, You’ll need to use wall anchors.
1) Drill Holes-
Drill holes on your marks the size specified by your toggle bolt wing anchors.
Now this is where I’m sharing the installation plan from the Amerock engineers:
2) Assemble Toggle Bolt Wing Anchors to the Mounting Plate-
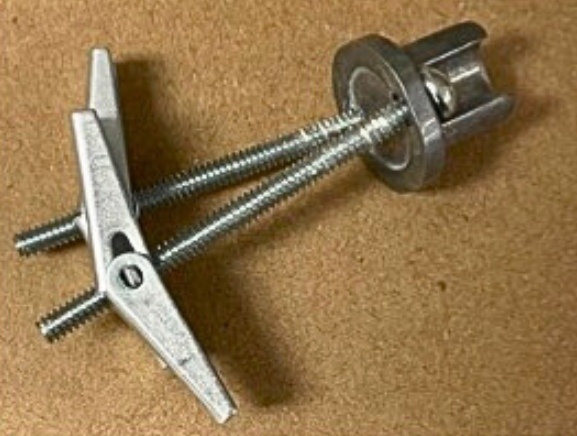

Assemble the toggle bolt wing anchors to the product mounting plate first, as they will need to be preassembled before pushing the toggles wings through the wall.
It is important to have both Toggle Wings about .25inch (1/4in) distance from the end of the screw. The closer theend of the center of the wings are to the end of the screw the better.
2) Push the Toggle Bolt Wing Anchors through the Holes-
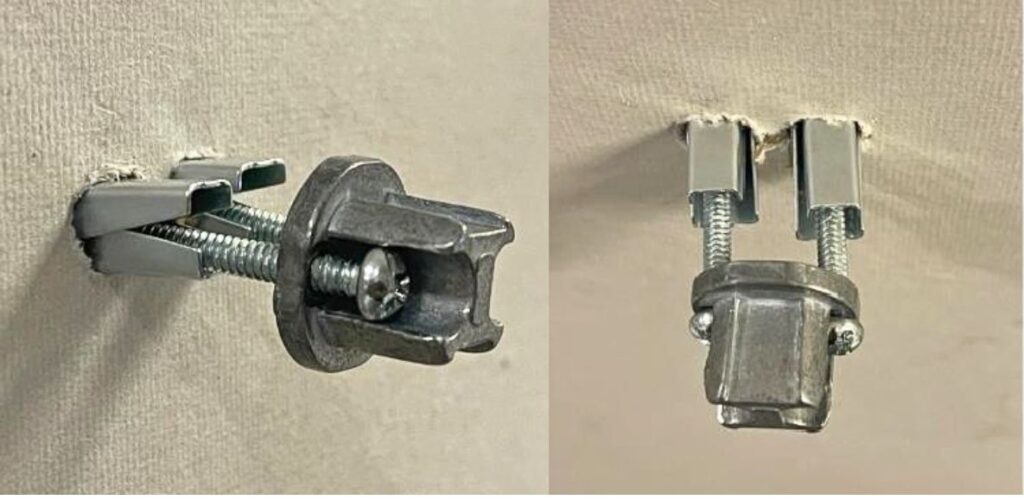
Align the two Toggle Bolt Wing Anchors into the holes by closing the spring-loaded wings.
Make certain the mounting plate set screw hole is on the bottom and the mounting plate is horizontally straight.
Force the wall anchors through the holes. Push the head of the screw and mounting plate toward the wall until you can’t any further.
Tap the mounting plate with a hammer until it is flush to the wall. You should hear the wings open up behind the drywall this means the wings are open and engaged.
3) Tighten the Screws-
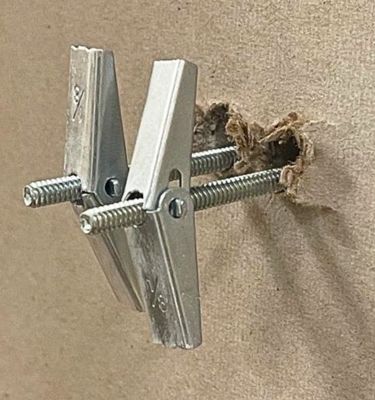
look / work behind the drywall before
tightening the screws.
Tighten both screws until mounting plate is secured to the wall with set screw hole at the bottom.
Because both screws are very long, this step will take some time to engage the toggle bolt wing anchors behind the wall.
Once completed and tightly secured, move on to installing the hooks.
4) Install Hook on Mounting Plate-
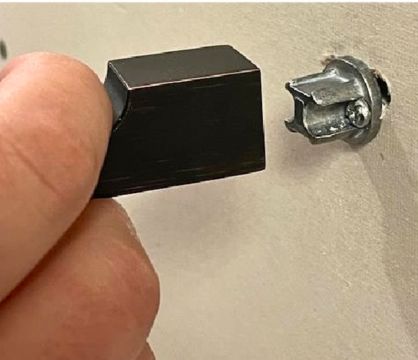
Use the set screw and Allen wrench to secure the Monument Hook to the mounting plate.
Inspired? Start Planning Your Own Makeover
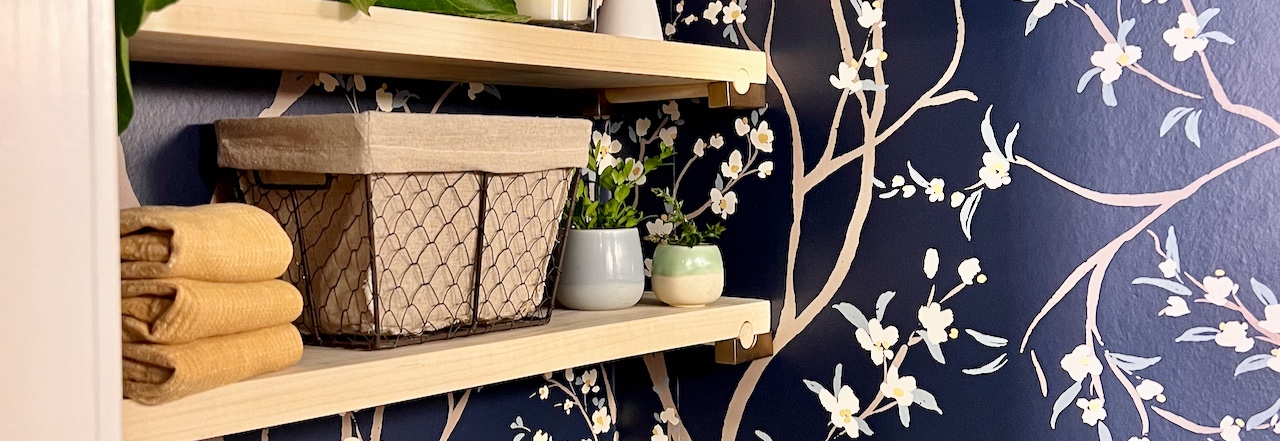
While this simple shelf design does not require a lot of space, it does provide the needed extra bathroom storage for a few bathroom essentials.
You can add a wire basket for extra toilet paper, a stack of extra hand towels, a jar candle and some faux plants or other decorative items.
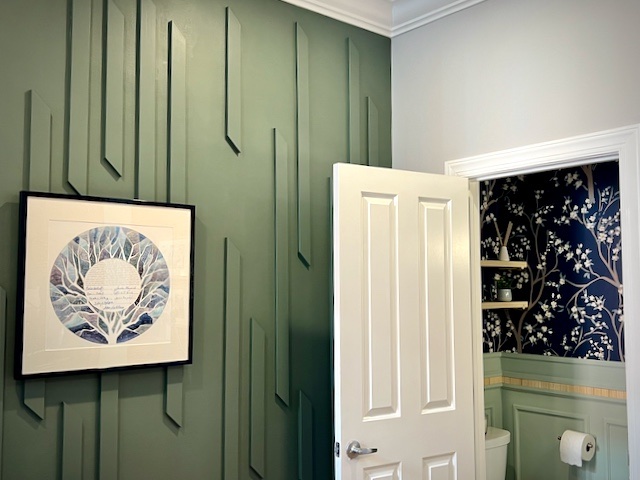
I am so thrilled with how these shelves turned out. In fact, the whole bathroom is beautiful, especially when viewed along with the dining room. It’s here that you can easily see the motivation behind a lot of the design decisions made throughout.
To follow along with the entire half bath remodel:
Dreaming, Planning & Preparation:
First Step – Wk 1 – Determining your goals for your makeover — starting with functionality and then adding style including general color palette
Next Step – Wk 2 – Refining and finalizing design choices — from flooring to wallpaper, to furniture pieces and specific paint colors
Third Step – Wk 3 — Planning and scheduling before installation — Planning aids for total project management to streamline the process, saving time, energy and money.
These are foundational steps, the core of good project management. Do NOT skip them.
Installation:
Wk 4 — Easy Way to Make Custom Stacked Wood Molding — Streamlined, modern wall molding is just a jig away.
Wk 5 — DIY Guide to Chair Rail and Picture Frame Molding — Step by Step how to add a unique chair rail and custom box frames.
Wk 6 — Half Bath Walls: Best Advice for Paper, Lights, Mirror! — How to pick the best options for your space and style.
Reveal:
Wk 8 — REVEAL: Too Good to Be True Half Bath Makeover
Bonus: The bathroom shelves, you’re here!
So, Did I Win You Over to Team Statement Hardware?
Save this Pin, so you’ll remember this hardware and How-To:

Let me know your thoughts below!!




0 Comments