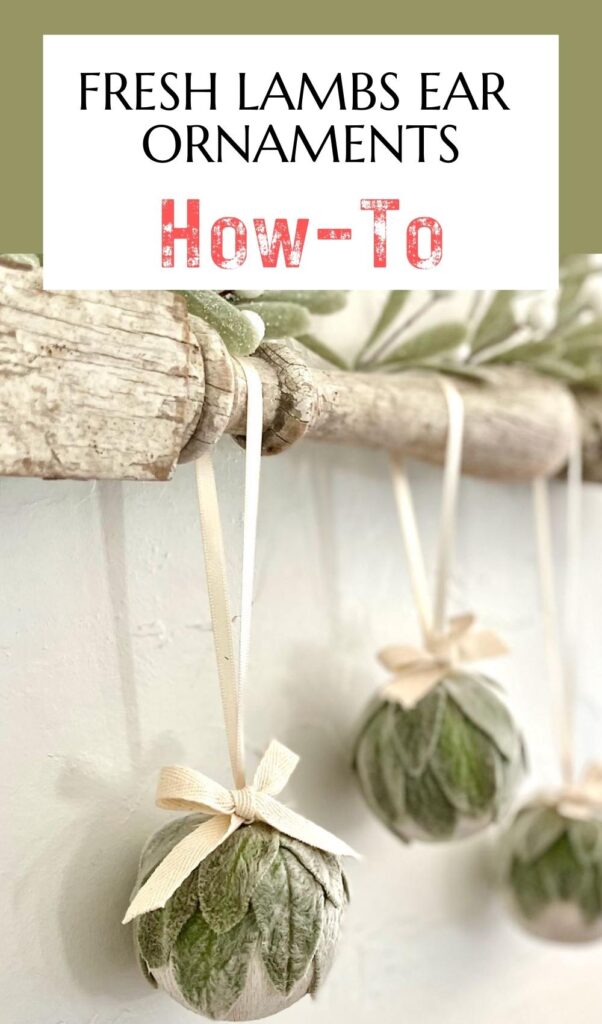
Fresh Lambs Ear Ornaments: How to Make Quickly and Simply
Your Lambs Ear garden clippings make easy, yet beautiful Christmas ornaments and decor. This is your complete guide to making fresh Lambs Ear Christmas ornaments. Plus styling tips for a fresh spin on your traditional wreaths and decor.
Are you looking for a unique ornament this Christmas? Forget the traditional glass ball or Santa figurine. Instead, try making one out of fresh lambs ear!
Have you ever seen a lamb’s ear plant before? If you haven’t, it’s definitely worth checking out! The leaves have a soft, fuzzy texture and a gorgeous soft sage green color that is perfect for making Christmas ornaments.
Previously, right here, I shared how to dry Lambs Ear. And then here, I accented a wreath with Lambs Ear.
But today, is the best! Today, I’m sharing how to make the most charming Lambs Ear bulbs or ornaments — perfect for a fresh take on Christmas decorating.
This simple tutorial will show you how to transform this rustic herb into a festive decoration.
BONUS: We get to skip drying the Lambs Ear. See, I told you it was simple!
So gather up some supplies and get started! You’ll be surprised at how easy it is to create these adorable ornaments. Merry Christmas!
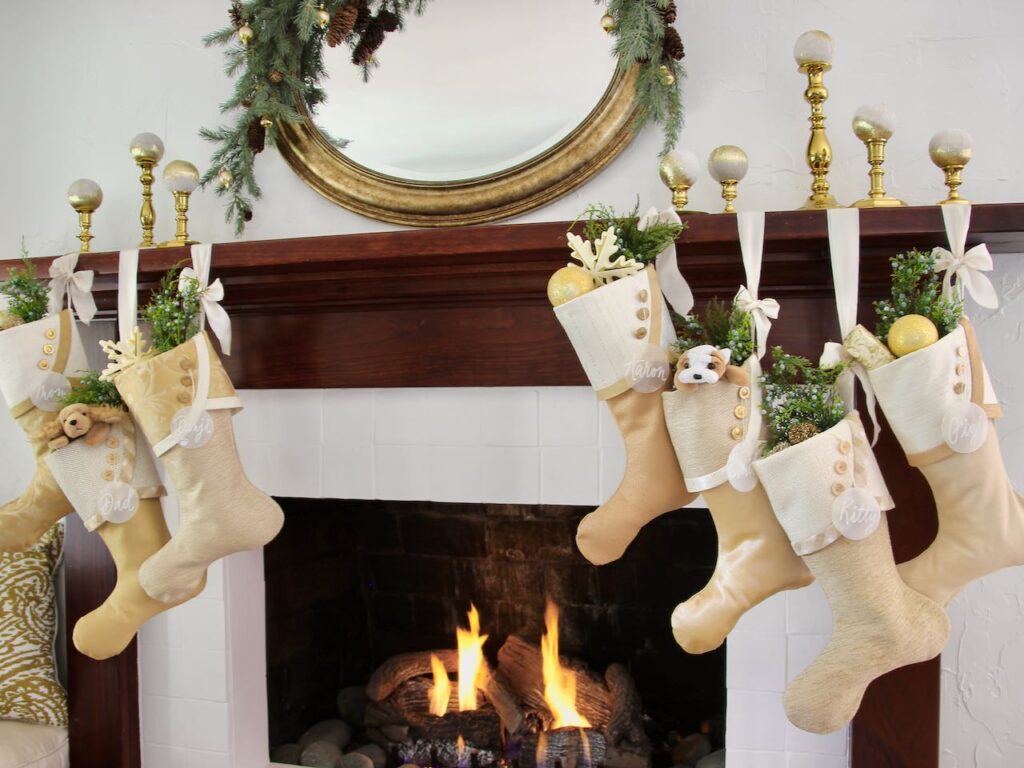
I used these as the mantel decor for this year’s Farmhouse Christmas stockings. You can see more of the display and stockings here.
They also look great with other natural elements — think pinecones and pine branches, poinsettias and wood elements.
What Can You Do With Lambs Ear?
Lambs Ear has medicinal properties and has long been used as a wound covering due to it’s soft absorbent leaves and natural antiseptic qualities.
It’s also used as a rustic herb in many parts of the world.
But I like to use it for decor. As is dries, it retains it’s soft fuzzy texture and the soft sage green coloring. As it slowly dries, it does become fragile and brittle.
So these ornaments are not long time keepsakes, but the memories of making them are!
Can You Use Lambs Ear for Christmas?
Absolutely! That’s why we’re here today.
Lambs Ear is enjoying a moment! Like in a big way. Everywhere you turn there are wreaths and garlands made of artificial lambs ear.
If you (or a sharing neighbor) have Lambs Ear in your garden, why not go for real — and free?
What To Use As the Base for Your Lambs Ear Balls?
I have only seen these ornaments done as a Swedish or Danish custom. There, they cover the entire bulb with leaves.
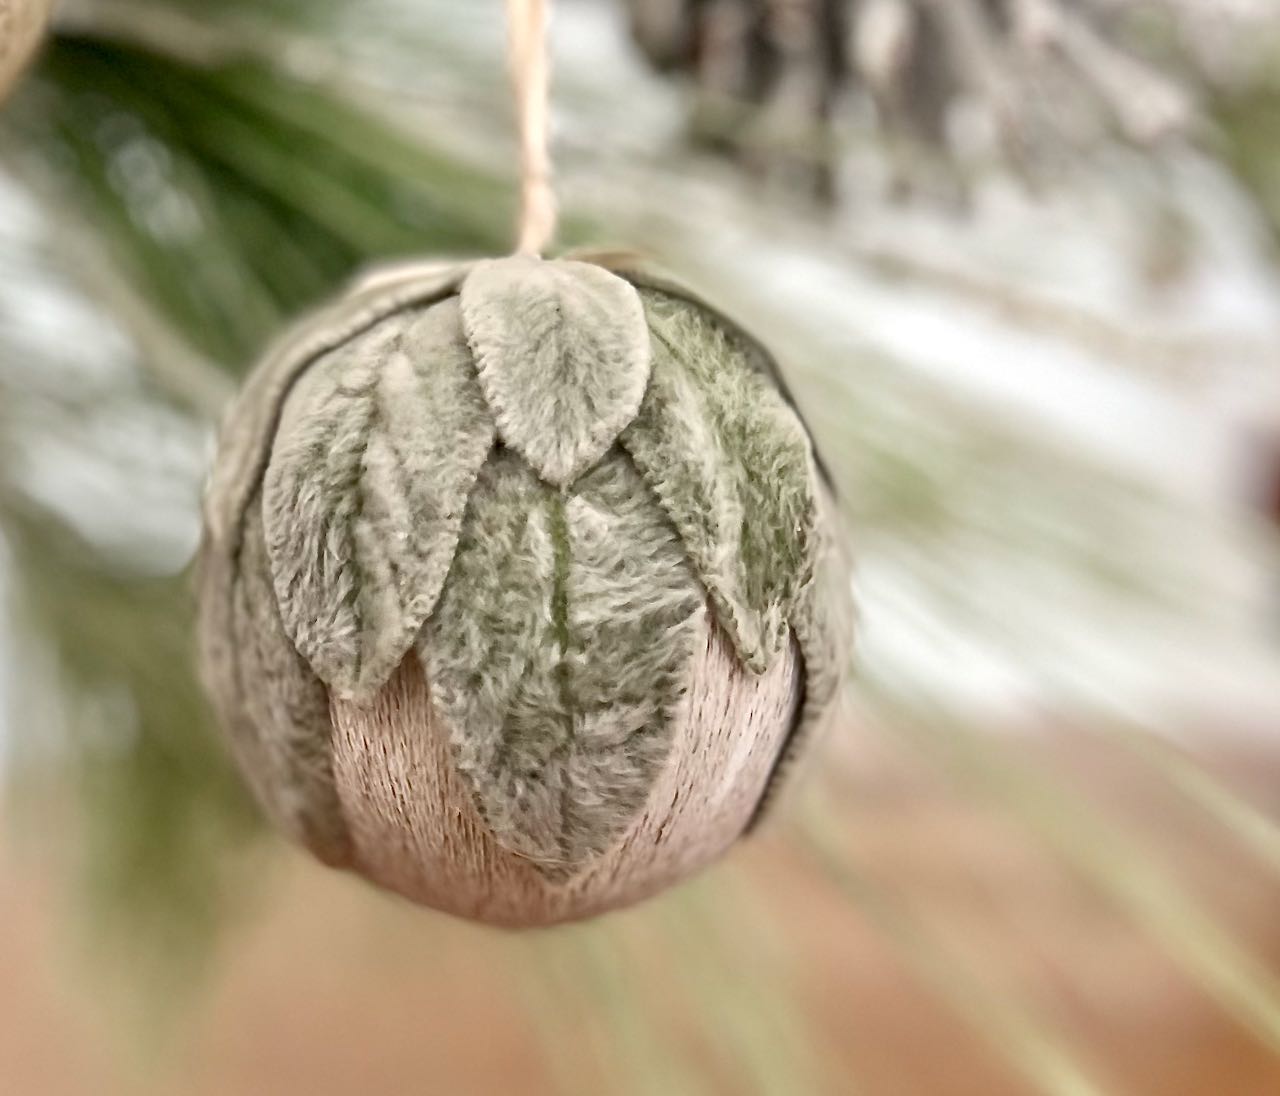
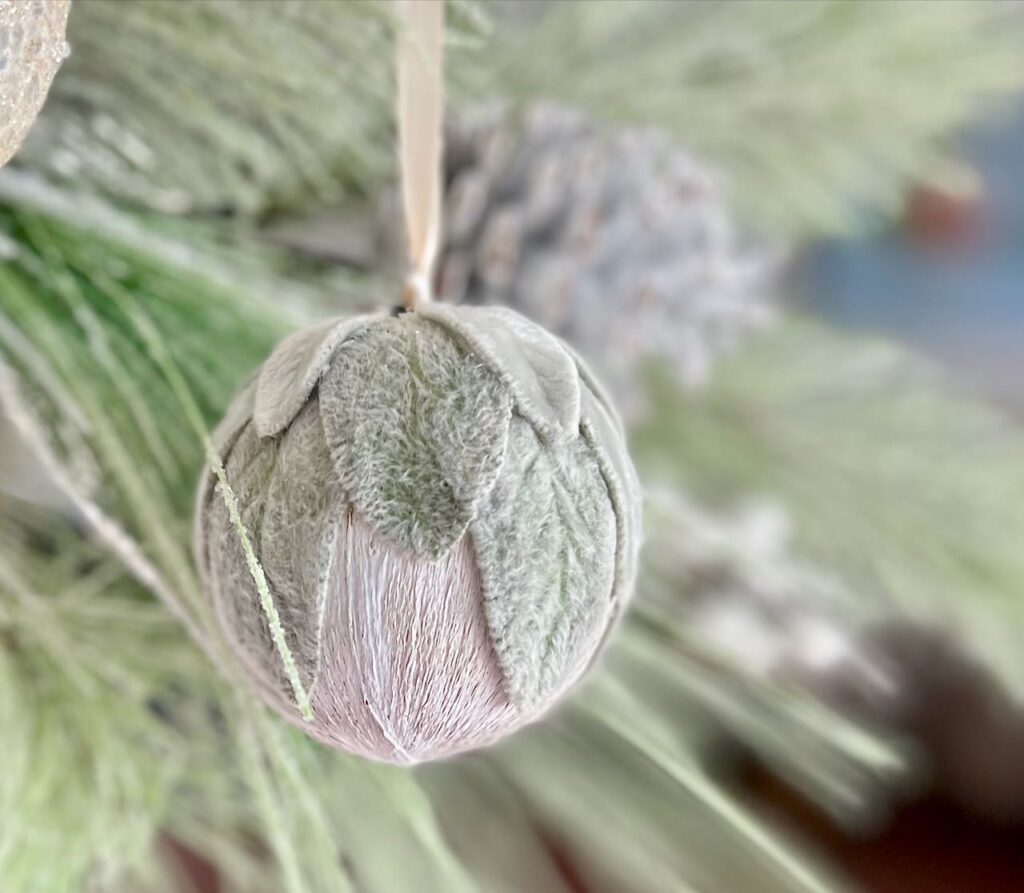
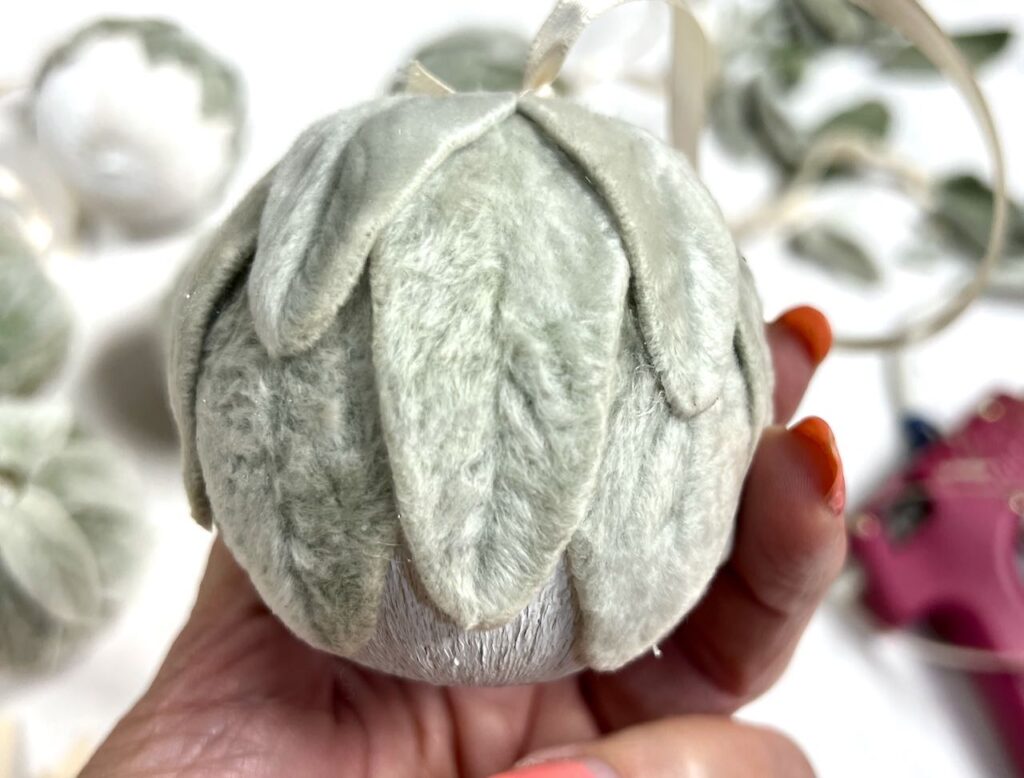
What I envisioned was several layers of leaves creating a shawl or collar over 2/3 to 1/3 of my Christmas bulbs. I wanted the sweet tips of the leaves to be highlighted against the bulbs.
I had a large supply of old gold string-wrapped ornaments from my sweet Mom-in-Law. (thank you, Mago!) I did not like the bright shiny gold against the Lambs Ear, so I painted just part of the bulbs. The how-to is here.
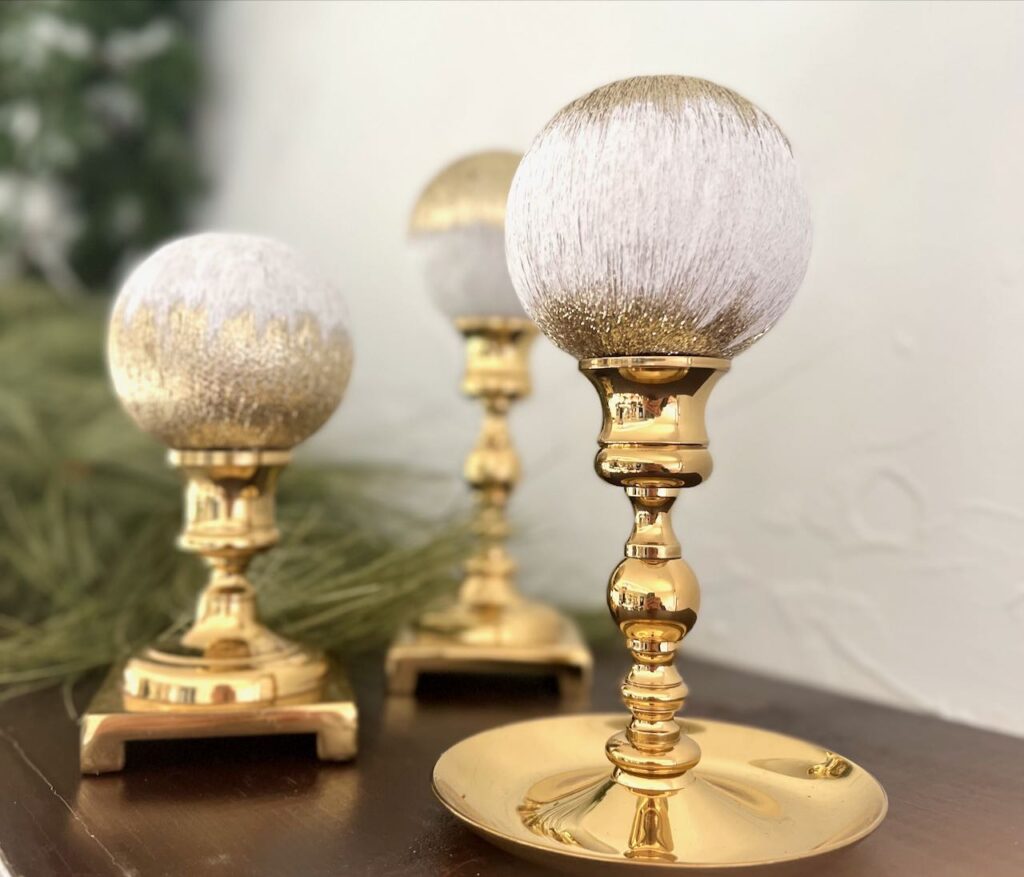
Surprisingly I LOVED how this paint treatment took on an ombre effect. Such an unplanned treat. I ended up using those ornaments for the mantel for this year’s Champagne Gold Christmas Stockings.
And some of the ones I painted just the bottoms, became the base for these Lambs Ear ornaments.
I also made one completely covering a bulb in the traditional way. For this one I used an old glass ornament that had been a trial for a painting technique. I wanted to make sure that the glue against the painted glass would not be a problem for you.
You’ll see at the end of the post, it worked great. No issues except a bit of a thick neck from the glass opening.
Let’s Get Started Making Lambs Ear Ornaments
Materials-
- Fresh cut Lambs Ear
- Old ornaments to cover
- Thin ribbon or twine for a hanger
Supplies-
- Hot glue gun
- glue sticks
- large piece if paper
- yardstick
- pencil or pen
Step 1) Prepare Your Paper-
You’ll want to organize your leaves by length. I found that pairs of parallel lines helped me with this.
Check your leaves for the general range of sizes. Different varieties of Lambs Ear will produce leaves in different ranges of length.
Draw pairs of parallel lines from your longest to the shortest. Differences in length become more obvious in the shorter leaves and these are the top layer. If you like a real tidy, symmetrical look to your ornaments, aim to have 6 of the smallest leaves all the same length.
If you embrace a Wabi-Sabi attitude, then go for the perfectly imperfect and don’t obsess here.
Step 2) Prepare Your Leaves–
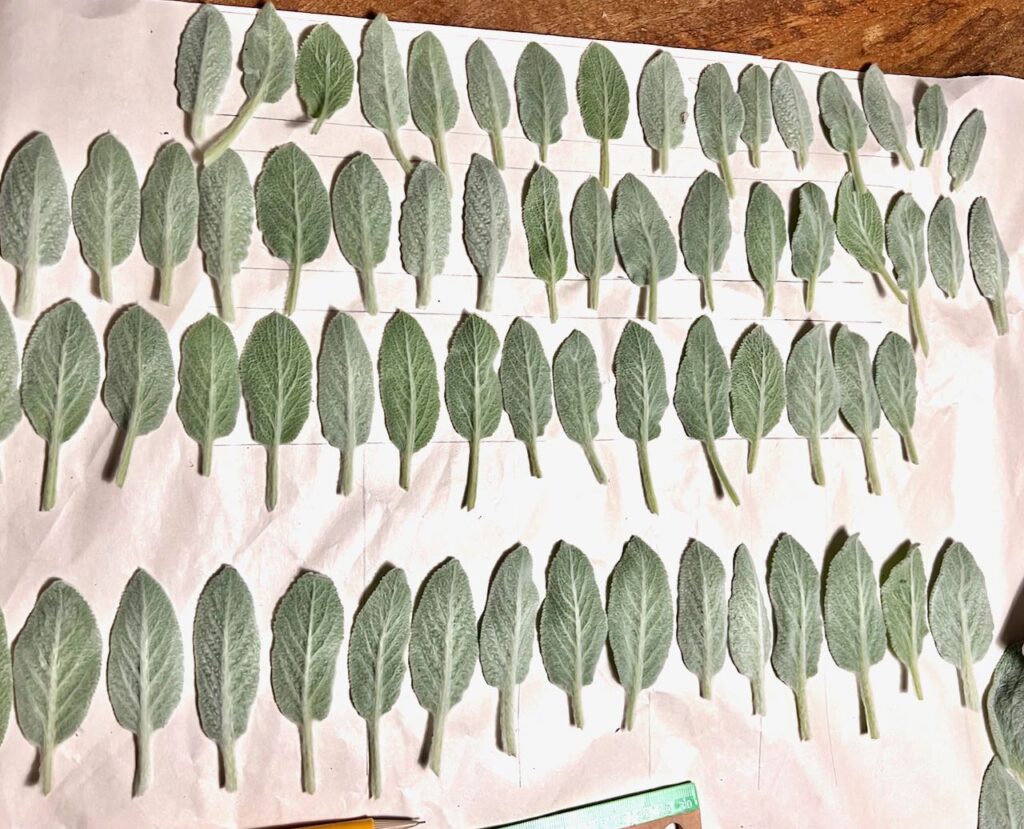
Arrange your leaves by size.
The stems past the leaves just get in the way. Clip them off. (I hadn’t done this yet when I took this picture. Best to snip them all off now)
Step 3) Start With Your Longest Row-
You will apply your leaves vertically on your bulb, working one after the other around the circumference.
So start by deciding where you want the bottom leaves to end.
I intentionally wanted my Lambs Ear to just lay over the top of the bulbs, covering anywhere from 2/3 to 1/3 of the ornament.
On the back of the leaves, run the hot glue down the length of the sides and the spine.
Carefully, place the tip of the leaf at the height you want on the bulb and then pull the leaf taut upward against the bulb.
You’ll repeat this four or five times around the bulb. Y0u want the leaves to barely overlap at their widest part. Everything above this meeting point and a bit below it will be covered with the next rows of leaves, so don’t worry about the Christmas bulb showing in those spots.
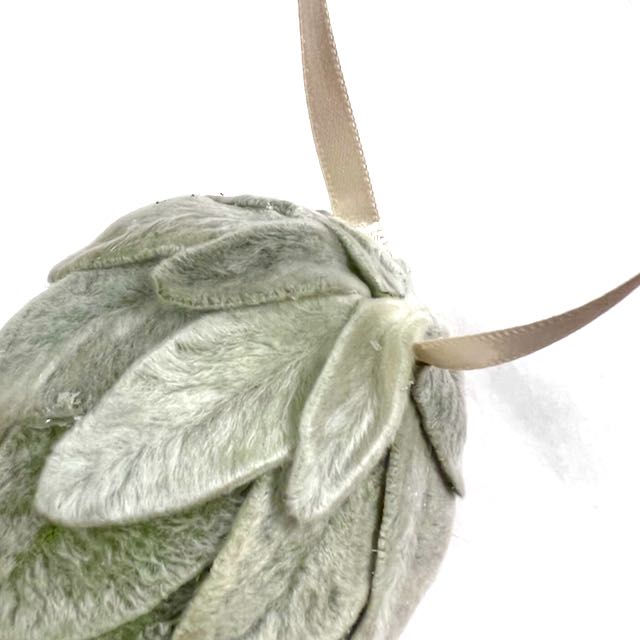
Aim to have all your tips ending about the same distance up the “South Pole” of your ornament.
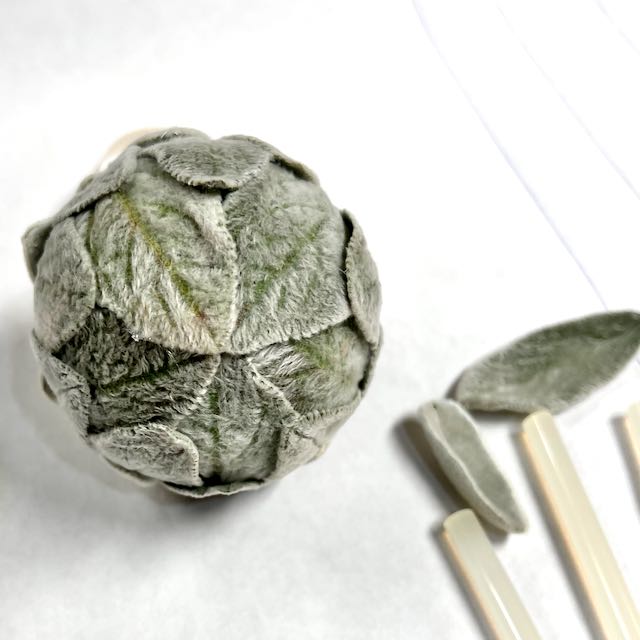
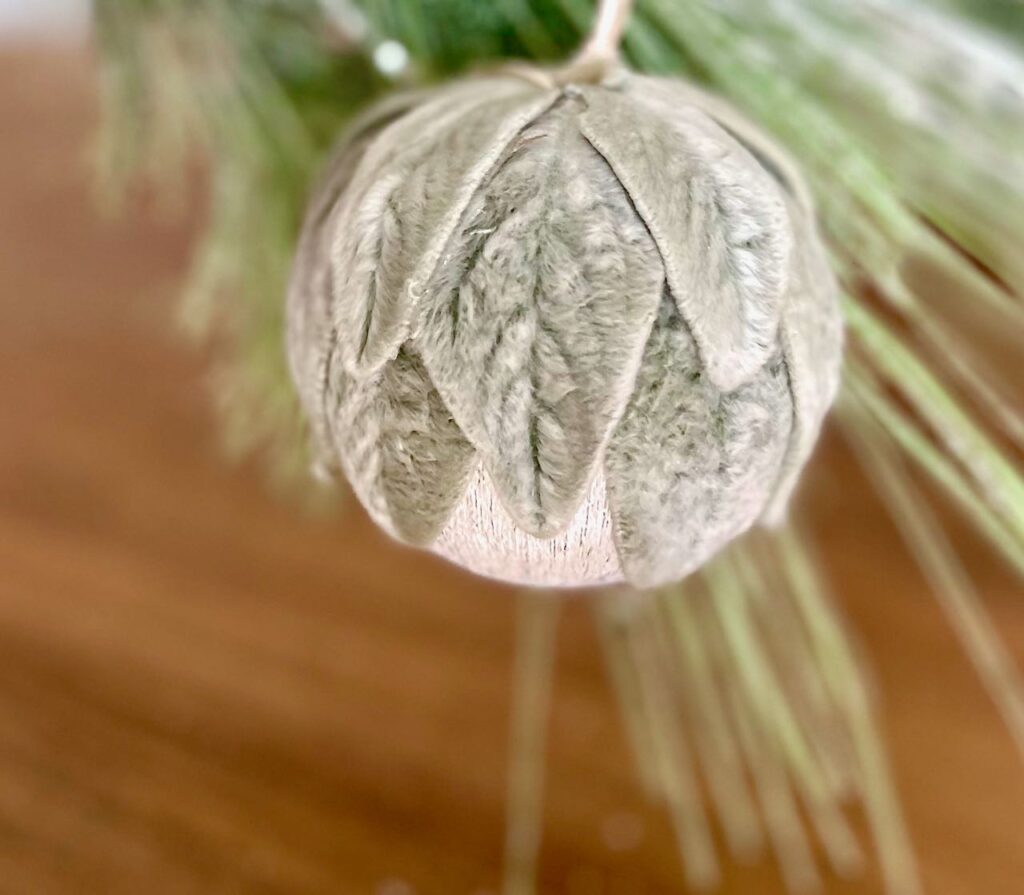
If you decide you want to go the traditional route and cover your entire bulb, The tips of your longest row should all meet together at the “South Pole” of the ornament. Notice how that row overlaps each other at the point, but very quickly the base ornament will start peeking through. Where that starts to happen is where your next row of leaves need to reach.
You’ll need 4 or five rows of leaves for full ornaments.
Step 4) Adding The Next Rows–
For each additional row, use a smaller size of leaves.
The second row is glued the same way, but the tip is laid in the center of the opening between two leaves of the first row and up a ways.
Just like before, aim for all the tips of the leaves in this row to begin at a common height.
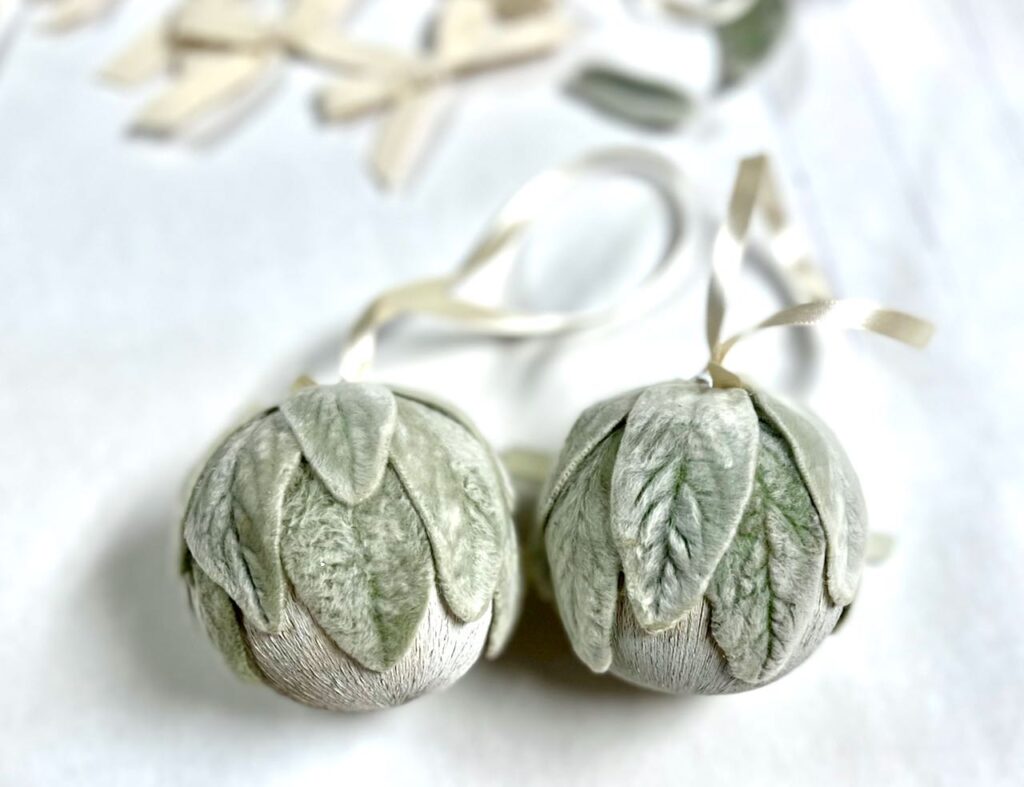
It’s up to your preference, also the size of the ornaments and the size of your leaves as to how many rows you layer.
On the left, I used three rows. On the right is just two rows.
Step 4) Final Row–
The final row will be your shortest and smallest leaves.
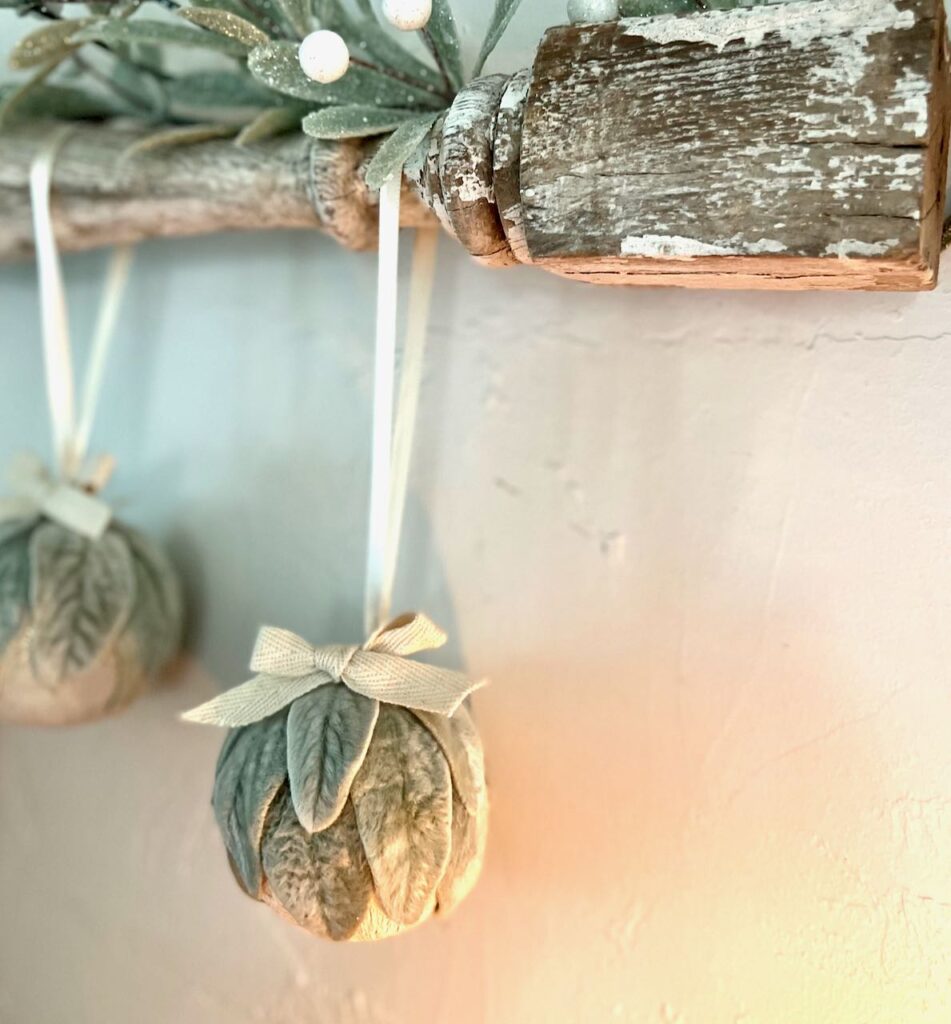
Before you glue them, determine how you’ll attach a hanger. There are several ways you can go.
If your base ornament does not have a neck — like maybe a styrofoam ball, then it’s easy to have the leaves just meet up and overlap a bit, Then attach a hanging loop with a straight pin.
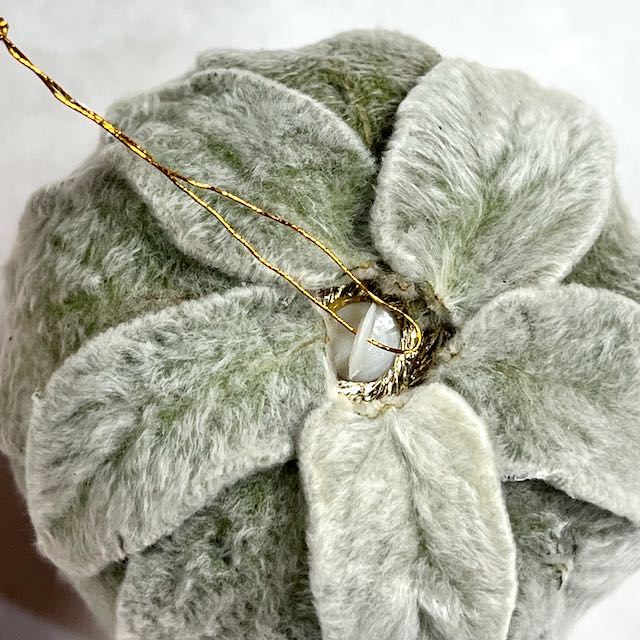
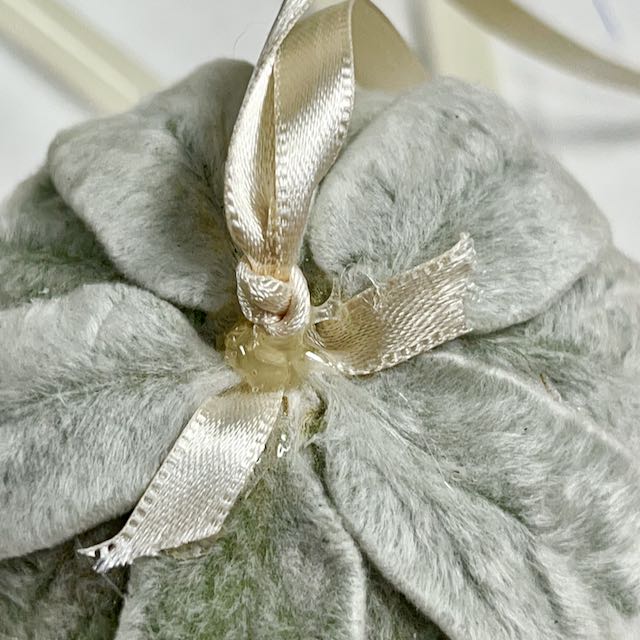
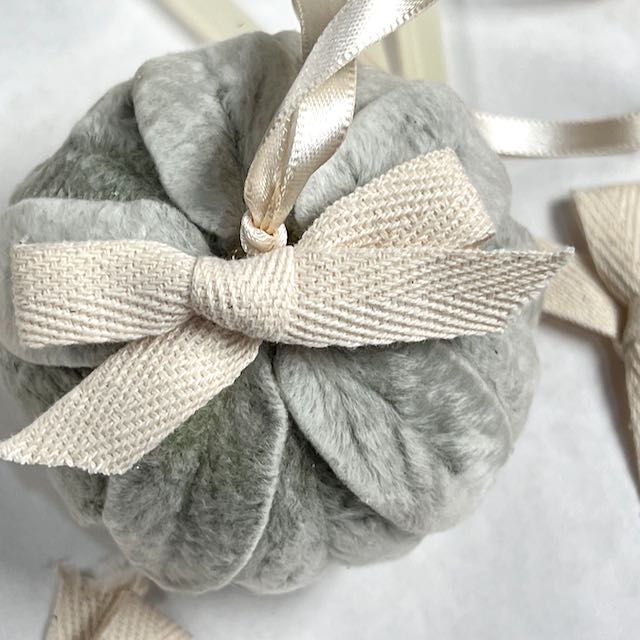
At any point, you can trim your leaves so they fit nicely together at the top like I did here. I didn’t worry too much about the gold threads showing, because I was replacing the gold threads with a thin ribbon and then glue a little bow over the center.
You can glue the leaves all down and together and then glue your hanger loop in place with a small bow on top of that as I did in th second and third pictures above. Or you may want to glue each end of a piece of thin ribbon on opposite sides, of the “North Pole” and then cover with these final leaves.
For the glass ornament with a neck, I opted to glue a thin ribbon to the inside of the neck opposite each other and then glued the smallest leaves up the side of the neck tucking them down inside.
May I ask, are you enjoying this post? We are just heading into “my” season. So hang on, there’s so much more coming! Don’t want to miss a thing? May I suggest subscribing? You pick how much!
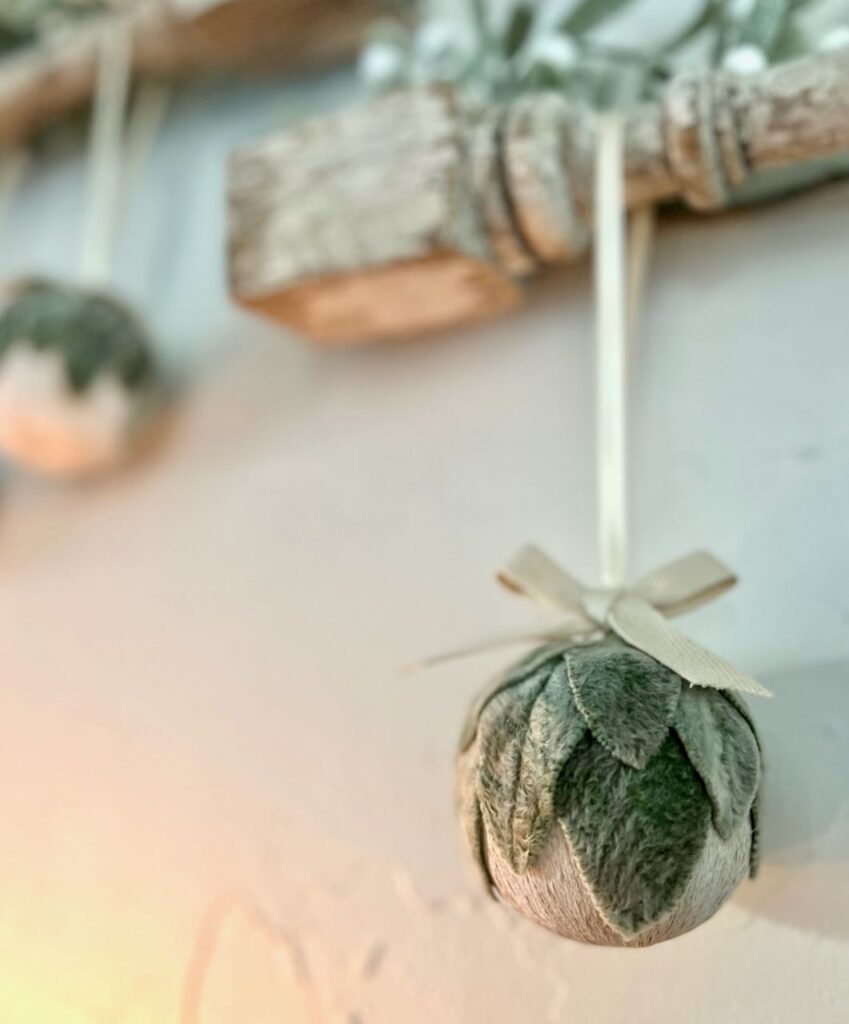
The Final Results!
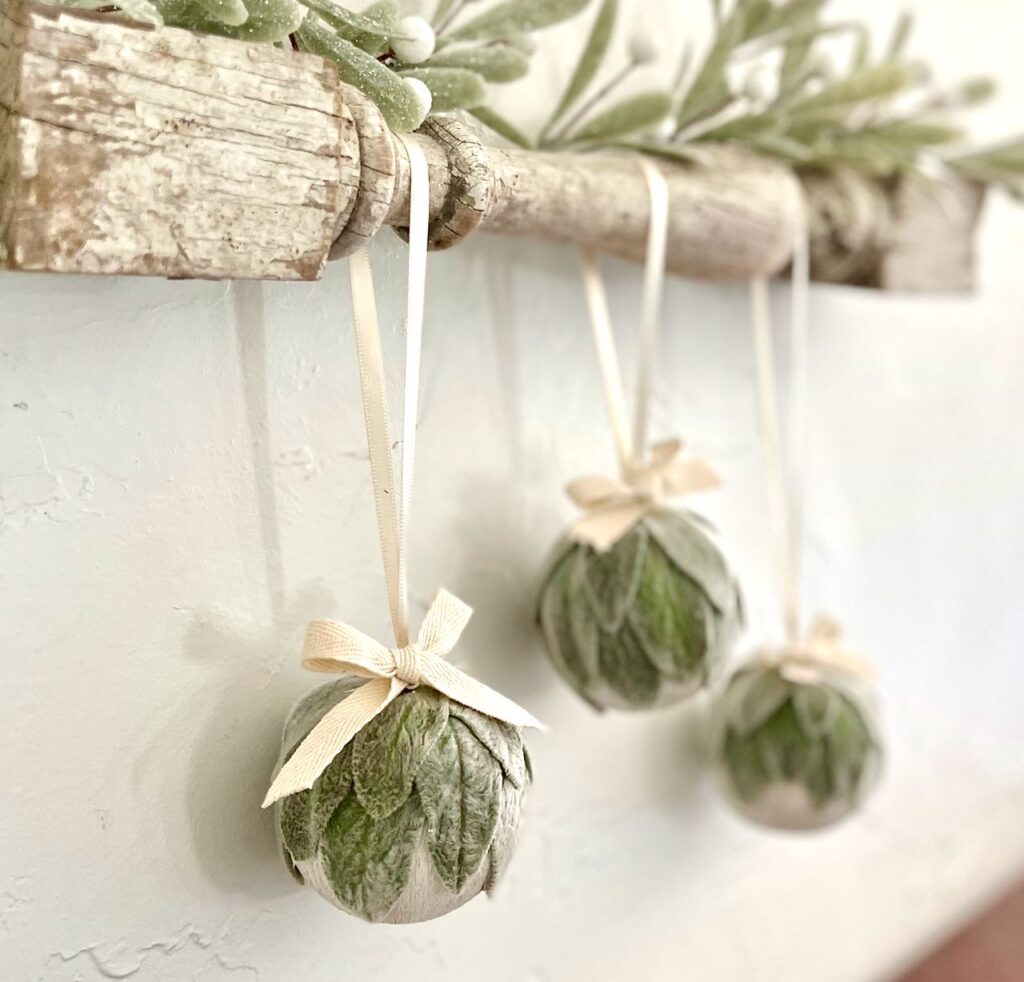
Aren’t they so fresh and charming? And just the sweetest!
I may use them after Christmas also, transitioning through the cold winter months, then I plan to wrap them gently and they’ll be in a cool, dark storage. I suspect I’ll be able to get a second season of merry joy out of them.
How about another parting shot?

Please pin this on every and any of your boards that make sense so you’ll be able to find it again.
Plus you’ll be helping me out greatly!
Now that you know how to make your own Fresh Lambs Ear Christmas Ornaments, give it a try! I’d love to see how yours turn out. Be sure to snap a photo and send it my way. Merry Christmas and Happy Crafting!

Oh Diane – those are the CUTEST!! What a brilliant idea – I LOVE them! Thanks for the Lamb’s Ear Love!
Aren’t they adorable?!! And they go together so fast. I think I’d like them even more on some glass bulbs that are matte finish. Sounds like there’d more chalk painting in my near future.
These are very pretty! I just need to acquire some Styrofoam balls, Lovely idea! I have two large patches of Lambs Ears in my garden and already used quite a lot together with pink helichrysoms, white ammi and purple and lilac static to make a 12 inch wreath for the living room- it looks beautiful!
Oh my goodness Judi, that wreath sounds amazing!!! I wouldlove to see a picture of it if you don’t mind sending one.
Absolutely love these ornaments anx will be making mine in the next 2 weeks. Thank you for sharing your creativity!
So hhappy to hear this Deb! Lett me know how they turn out.
OH My Goodness!
I read the original post first and was so excited. Then I read this one! This years tree is going to be called “South House Design Inspired”
I can’t wait till the morning to cut leaves
You are too funny Lynn! Actually, like the sound of that — an SHD Tree
These are just beautiful Diane!! I cannot wait to add these to my Christmas to-do-for-fun list!! Pinned 🥰
These are absolutely beautiful, Diane! Thanks so much for sharing this wonderful idea!
Lambs ear is one of my favorite plants and I can’t wait to make some of these! Any idea how long they will last and how fragile they get?
I’m fairly certain I’ll get two seasons out of these. I think I’ll use them through the holidays and then transition through winter, then pack them gently in tissue paper and pack lightly in a box in the dark basement. until next holiday season.
They retain the soft sage color and the fuzzy texture, but they do become brittle as they dry. But if they aren’t handled a lot, I’m hopeful I can hang them for a second Christmas.
These are AMAZING, Diane! I may have to plant some lambs ear around here…
I’m planting a whole field next year — BONUs, ot’s one of the few things the deer are not eating (yet, anyway).
Diane these are beautiful! i love lambs ear! I pinned this post so I can hopefully try to duplicate. I hope you will come by my blog and link up for a chance to be featured! https://www.ourtinynest.com/2022/10/19/wednesday-link-party-318/
These ornaments are just stunning!!! They remind me of cottage…like a cozy cottage Christmas in the English countryside 🙂 Thanks so much for sharing these at Home Imagined this week!!
Thanks to you Rachel! I’m so glad to join another link party!
Diane,
These are just so adorable. I’ve never seen them before. I’ll share a link on my Sunday, Dirt Road Adventures.
Thanks bunches Rachel. They are an old Danish tradition. But the original way is to cover the entire ornament. It ends up looking a bit oblong and sometimes more of an artichoke. But I thought it might be fun to just do a collar and I love it this way.
I love the soft and fuzzy nature of these lambs ears on the ornaments. Another great idea for Christmas ornaments!
I just love the cozy feel they bring. Thanks Anna!
Diane these are so beautiful! Thank you so much for linking up in my weekly Wednesday link party last week! This was my favorite post and I am happy to be featuring you this week! https://www.ourtinynest.com/2022/11/09/weekly-wednesday-link-party-321/